by Nick Gromicko, CMI® and Kenton Shepard

Poorly installed and maintained electrical cables are a common cause of electrical fires in homes. Many older homes contain wiring that is now considered obsolete or dangerous. InterNACHI inspectors should understand the basic distinctions between the different types of cable systems so that they can identify unsafe conditions.common cable types seen during a home inspection
Romex Cables

Romex is the trade name for a type of electrical conductor with non-metallic sheathing that is commonly used as residential branch wiring. The following are a few basic facts about Romex wiring:

  • Romex™ is a common type of residential wiring that is categorized by the National Electrical Code (NEC) as underground feeder (UF) or non-metallic sheathed cable (NM and NMC).
  • NM and NMC conductors are composed of two or more insulated conductors contained in a non-metallic sheath. The coating on NMC cable is non-conducting, flame-resistant and moisture-resistant. Unlike other cables commonly found in homes, they are permitted in damp environments, such as basements.
  • Underground feeder conductors appear similar to NM and NMC cables except that UF cables contain a solid plastic core and cannot be “rolled” between fingers.
The following NEC regulations apply to Romex conductors:
  • They are not permitted in residential construction higher than three stories, or in any commercial construction.
  • They must be protected, secured and clamped to device boxes, junction boxes and fixtures.
  • Support devices that may damage the cables, such as bent nails and overdriven staples, are not permitted.
  • NM and NMC cables should be secured at intervals that do not exceed 4½ feet, and they should be secured within 12 inches of junction boxes and panels to which they are attached. Cables that do not comply with this rule can sag and are vulnerable to damage.
  • They are intended as permanent wiring in homes and should not be used as a substitute for appliance wiring or extension cords.

Note:  Some communities have never allowed the use of Romex wiring in residential construction. Armored cable is typically used in these communities.

Armored Cables (AC)
Armored cable (AC), also known as BX, was developed in the early 1900s by Edwin Greenfield. It was first called “BX” to abbreviate “product B – Experimental,” although AC is far more commonly used today. Like Romex cables, they cannot be used in residences higher than three stories, and the rules for protection and support of AC wiring are essentially the same as the rules for Romex. Unlike Romex, however, AC wiring has a flexible metallic sheathing that allows for extra protection. Some major manufacturers of armored cable are General Cable, AFC Cable Systems, and United Copper Systems.
Service Entry (SE) Conductorsmight find old knob and tube wiring during a home inspection
These cables begin at the splice and enter the meter. They are not permitted inside homes, with the exception of “style R” SE cable that can serve as interior wiring in branch circuits for ovens and clothes dryers. Style R cables should be clearly marked on their jacket surfaces.
Knob-and-Tube (KT) Wiring
Most houses constructed prior to World War II were wired using the knob-and-tube method, a system that is now obsolete. They are more difficult to improve than modern wiring systems and are a fire hazard. Knob-and-tube wiring is supported with ceramic knobs, and runs intermittently though ceramic tubes beneath framing and at locations where the wires intersect. Whenever an inspector encounters knob-and-tube wiring, s/he should identify it as a defect and recommend that a qualified electrician evaluate the system. The following are a few reasons why inspectors should be wary of this old wiring system:
  • The dissipated heat from knob-and-tube wiring can pose a fire hazard if the wires are enveloped in building insulation. A possible exception is fiberglass insulation, which is fire-resistant, although even this type of insulation should not cover knob-and-tube wiring. The homeowner or an electrician should carefully remove any insulation that is found surrounding KT wires.
  • Knob-and-tube wiring is more vulnerable to damage than modern wiring because it is insulated with fiber materials and varnish, which can become brittle.
  • Some insurance companies refuse to write fire insurance for houses with this type of wiring, although this may be remedied if an electrician can verify that the system is safe.
  • Disregarding any inherent inadequacies, existing KT cable systems are likely to be unsafe because they are almost guaranteed to be at least 50 years old.
In summary, inspectors should understand the different types of conductors that are commonly found in homes.  This article is from InterNACHI and can be found at https://www.nachi.org/conductor-types.htm.

by Nick Gromicko, CMI® and Kenton Shepard

common Central humidifier that you will see as a home inspector
Humidifiers are devices that humidify air so that building occupants are comfortable. Central humidifiers are hard-wired into a house’s plumbing and forced-air heating systems.

What is humidity? 

Humidity refers to the amount of moisture in the air. “Relative humidity” signifies the amount of moisture in the air relative to the maximum amount of water the air can contain before it becomes saturated. This maximum moisture count is related to air temperature in that the hotter the air is, the more moisture it can hold. For instance, if indoor air temperature drops, relative humidity will increase.

How do central air humidifiers work?

Central air humidifiers are integrated into the forced-air heating system so that they humidify air while it is being heated. The water that is used by the device is pumped automatically into the humidifier from household plumbing, unlike portable humidifiers, which require the user to periodically supply water to the device. Humidifiers are available in various designs, each of which turns liquid water into water vapor, which is then vented into the house at an adjustable rate.

Why humidify air?

Certain airborne pathogens, such as those that cause the flu, circulate easier in dry air than in moist air. Moist air also seems to soothe irritated, inflamed airways. For someone with a cold and thick nasal secretions, a humidifier can help thin out the secretions and make breathing easier.

Indoor air that is too dry can also cause the following problems:

  • damage to musical instruments, such as pianos, guitars and violins;
  • dry skin;
  • peeling wallpaper;
  • static electricity, which can damage sensitive electrical equipment, cause hair to stick up, and can be painful or annoying; and
  • cracks in wood furniture, floors, cabinets and paint.

Central Humidifier Dangers

Humidifiers can cause various diseases. The young, elderly and infirm may be particularly at risk to contamination from airborne pollutants, such as bacteria and fungi. These can grow in humidifiers and get into the air by way of the vapor where it can be breathed in. Some of the more common diseases and pathogens transmitted by humidifiers are:

  • Legionnaires’ Disease. Health problems caused by this disease range from flu-like symptoms to serious infections. This problem is generally more prevalent with portable humidifiers because they draw standing water from a tank in which bacteria and fungi can grow;
  • thermophilic actinomycetes. These bacteria thrive at temperatures of 113° to 140° F and can cause hypersensitivity pneumonitis, which is an inflammation of the lungs; and
  • “humidifier fever,” which is a mysterious and short-lived, flu-like illness marked by fever, headache, chills and malaise, but without prominent pulmonary symptoms. It normally subsides within 24 hours without residual effects.

Other problems associated with humidifiers include:

  • accumulation of white dust from minerals in the water. These minerals may be released in the mist from the humidifier and settle as fine white dust that may be small enough to enter the lungs. The health effects of this dust depend on the types and amounts of dissolved minerals. It is unclear whether these minerals cause any serious health problems;
  • moisture damage due to condensation. Condensed water from over-humidified air will appear on the interior surfaces of windows and other relatively cool surfaces. Excessive moisture on windows can damage windowpanes and walls, but a more serious issue is caused when moisture collects on the inner surfaces of exterior walls. Moisture there can ruin insulation and rot the wall, and cause peeling, cracking or blistering of the paint; and
  • accumulation of mold. This organic substance grows readily in moist environments, such as a home moistened by an over-worked humidifier. Mold can be hazardous to people with compromised immune systems.

Designs and Maintenancecommon Humidistat that you will see as a home inspector

  • drum-type humidifier:  has a rotating spongy surface that absorbs water from a tray. Air from the central heating system blows through the sponge, vaporizing the absorbed water. The drum type requires care and maintenance because mold and impurities can collect in the water tray. According to some manufacturers’ instructions, this tray should be rinsed annually, although it usually helps to clean it several times per heating season.
  • flow-through or “trickle” humidifier:  a higher quality though more expensive unit than the drum-type, which allows fresh water to trickle into an aluminum panel. Air blows through the panel and forces the water to evaporate into the air stream. Excess water exits the panel into a drain tube. This design requires little maintenance because the draining water has a “self-cleaning” effect and, unlike the drum-type humidifier, there is no stagnant water.

Other tips that InterNACHI inspectors can pass on to their clients:

  • If equipped with a damper, it should be closed in the summer and opened in the winter. The damper may appear as a knob that can be set to “summer” or “winter” setting, or it may be a piece of metal that can be inserted to cover the duct opening.
  • The humidifier is controlled by a humidistat, which must be adjusted daily. Some new models do this automatically, although most require daily attention from building occupants. The humidistat should contain a chart that can be used to identify the proper setting based on the outdoor temperature. If this adjustment is not performed, condensation will likely collect on cool surfaces and potentially lead to mold or wood rot. Many homeowners do not know that this calibration is necessary.
  • The furnace might need to be checked for rust. Some humidifiers are installed inside the plenum of the furnace, which can be damaged by rust if the humidifier leaks.
  • Central humidifiers may have a solid core that should be replaced each year. The manufacturer’s instructions should be consulted regarding this replacement.
In summary, central humidifiers are used to humidify air to make it more comfortable, but they can cause health problems and building damage if they are not properly maintained.  This article is from InterNACHI and can be found at https://www.nachi.org/central-humidifiers.htm.

by Nick Gromicko, CMI® and Kenton Shepard

Arc-fault circuit interrupters (AFCIs) are special types of electrical receptacles or outlets and circuit breakers designed to detect and respond to potentially dangerous electrical arcs in home branch wiring.different types of afci's that you might see as a home inspector
How do they work?
AFCIs function by monitoring the electrical waveform and promptly opening (interrupting) the circuit they serve if they detect changes in the wave pattern that are characteristic of a dangerous arc. They also must be capable of distinguishing safe, normal arcs, such as those created when a switch is turned on or a plug is pulled from a receptacle, from arcs that can cause fires. An AFCI can detect, recognize, and respond to very small changes in wave pattern.
What is an arc?
When an electric current crosses an air gap from an energized component to a grounded component, it produces a glowing plasma discharge known as an arc. For example, a bolt of lightening is a very large, powerful arc that crosses an atmospheric gap from an electrically charged cloud to the ground or another cloud. Just as lightning can cause fires, arcs produced by domestic wiring are capable of producing high levels of heat that can ignite their surroundings and lead to structure fires.
According to statistics from the National Fire Protection Agency for the year 2005, electrical fires damaged approximately 20,900 homes, killed 500 people, and cost $862 million in property damage. Although short-circuits and overloads account for many of these fires, arcs are responsible for the majority and are undetectable by traditional (non-AFCI) circuit breakers.
Where are arcs likely to form?
Arcs can form where wires are improperly installed or when insulation becomes damaged. In older homes, wire insulation tends to crystallize as it ages, becoming brittle and prone to cracking and chipping. Damaged insulation exposes the current-carrying wire to its surroundings, increasing the chances that an arc may occur.

Situations in which arcs may be created:

  • electrical cords damaged by vacuum cleaners or trapped beneath furniture or doors.
  • damage to wire insulation from nails or screws driven through walls.
  • appliance cords damaged by heat, natural aging, kinking, impact or over-extension.
  • spillage of liquid.
  • loose connections in outlets, switches and light fixtures.
Where are AFCIs required?
Locations in which AFCIs are required depend on the building codes adopted by their jurisdiction.
The 2006 International Residential Code (IRC) requires that AFCIs be installed within bedrooms in the following manner:

E3802.12 Arc-Fault Protection of Bedroom Outlets. All branch circuits that supply120-volt, single-phase, 15- and 20-amp outlets installed in bedrooms shall be protected by a combination-type or branch/feeder-type arc-fault circuit interrupter installed to provide protection of the entire branch circuit.

Exception: The location of the arc-fault circuit interrupter shall be permitted to be at other than the origination of the branch circuit, provided that:
  1. The arc-fault circuit interrupter is installed within 6 feet of the branch circuit overcurrent device as measured along the branch circuit conductors, and
  2. The circuit conductors between the branch circuit overcurrent device and the arc-fault circuit interrupter are installed in a metal raceway or a cable with metallic sheath.
The National Electrical Code (NEC) offers the following guidelines concerning AFCI placement within bedrooms:
Dwelling Units. All 120-volt, single phase, 15- and 20-ampere branch circuits supplying outlets installed in dwelling unit in family rooms, dining rooms, living rooms, parlors, libraries, dens, sun rooms, recreation rooms, closets, hallways, or similar rooms or areas shall be protected by a listed arc-fault circuit interrupter, combination-type installed to provide protection of the branch circuit.
Home inspectors should refrain from quoting exact code in their reports. A plaintiff’s attorney might suggest that code quotation means that the inspector was performing a code inspection and is therefore responsible for identifying all code violations in the home.  Some jurisdictions do not yet require their implementation in locations where they can be helpful.how to identify an afci during a home inspection
What types of AFCIs are available?
AFCIs are available as circuit breakers for installation in the electrical distribution panel.

Nuisance Tripping

An AFCI might activate in situations that are not dangerous and create needless power shortages. This can be particularly annoying when an AFCI stalls power to a freezer or refrigerator, allowing its contents to spoil. There are a few procedures an electrical contractor can perform in order to reduce potential “nuisance tripping,” such as:
  • Check that the load power wire, panel neutral wire and load neutral wire are properly connected.
  • Check wiring to ensure that there are no shared neutral connections.
  • Check the junction box and fixture connections to ensure that the neutral conductor does not contact a grounded conductor.
Arc Faults vs. Ground Faults
It is important to distinguish AFCI devices from Ground Fault Circuit Interrupter (GFCI) devices. GFCIs detect ground faults, which occur when current leaks from a hot (ungrounded) conductor to a grounded object as a result of a short-circuit. This situation can be hazardous when a person unintentionally becomes the current’s path to the ground. GFCIs function by constantly monitoring the current flow between hot and neutral (grounding) conductors, and activate when they sense a difference of 5 milliamps or more. Thus, GFCIs are intended to prevent personal injury due to electric shock, while AFCIs prevent personal injury and property damage due to structure fires.
In summary, AFCIs are designed to detect small arcs of electricity before they have a chance to lead to a structure fire.  This article is from InterNACHI and can be found at https://www.nachi.org/arc-fault-circuit-interrupters.htm.

by Nick Gromicko, CMI®

Synthetic Stucco

Synthetic stucco is quite different from historic stucco.  Historic stucco is basically a plaster made with water, sand and lime.  While the composition of stucco has changed over time, it has always been applied wet over a brick, stone or wood surface to form the visible outside layer of a wall.

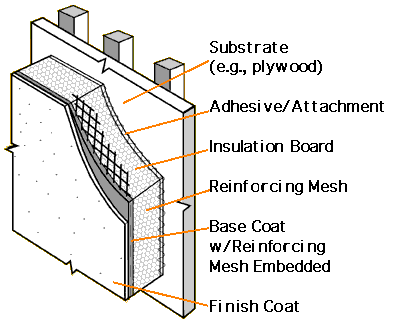
Synthetic stucco is foamboard and fiberglass mesh attached to a wall that is covered with a polymer-based material which is then textured to look like historic stucco.  It is technically known as an exterior insulation and finish system, or EIFS.  It has been in use in Europe since the 1950s, and in the U.S. since the late ‘60s.  It is often used on wood-framed houses.
Why is water damage a concern?
Any building material used on the exterior of residential homes will allow water or water vapor that finds its way inside to eventually escape back to the atmosphere.  EIFS itself, however, blocks the movement of water and water vapor – it does not “breathe.”  This, coupled with interior vapor barriers that are often required by building code, can lead to prolonged moisture intrusion and, eventually, rotting of materials.
Water can find its way inside through any cracks that have developed, or through any areas where the EIFS is jointed with a different material, such as door and window frames, or at the roof.  If the EIFS continues below ground level, any cracks or openings in the finish will allow moisture, as well as wood-destroying organisms, such as termites, inside.  When prolonged moisture intrusion of the wood behind the EIFS reaches 30%, rotting will occur.

Has water damage occurred or is it likely to occur? 

A preliminary visual inspection may reveal if water damage is actively occurring, as well as whether it is likely to occur due to improperly installed synthetic stucco. There have been many reported cases of EIFS manufacturer installation instructions not being followed correctly by builders, leading to problems.  It’s a good idea for inspectors to understand some of the methods of installation so that they can check some likely areas of moisture intrusion.

A few places to start visual inspection include:

  • ground contact:  EIFS should not continue down a wall into the ground.  It should terminate no less than 6 inches from finished ground level.  The bottom lip of the EIFS should also be properly wrapped and sealed;
  • roof flashing:  Kickout flashing should be installed where the EIFS meets the roofline.  If this is missing, there is a good possibility that water is entering the wall cavity.  Check for any areas that feel soft or are discolored;
  • joints around windows and doors:  Check caulking joints around windows and doors to make sure that there are no cracks, even small ones.  If wood on window or door frames feels soft, or it is discolored, water may have entered the wall assembly around the frame; and
  • areas of cracking or bulging:  If there are cracks in the EIFS itself, moisture will be able to infiltrate the wall assembly and cause rotting.  Bulges can indicate that coatings are delaminating or detaching from the polystyrene board.  These would be causes for concern.

Inspection for Moisture Intrusion

If a visual inspection reveals any evidence of damage, or that the EIFS has been installed incorrectly, further inspection may be in order.  An inspection for moisture intrusion consists of inserting a small probe through the outer wall into the frame area to determine the moisture content of the cavity.  The probe will leave holes about 1/8-inch in diameter, which can be sealed afterward.  The moisture readings can be gathered from typical problem areas, such as around windows and doors, roof eaves, near decks, and so on.  Once a more precise estimate of damage is obtained, options for repair can be evaluated by the homeowner.  These may include anything from additional caulking and sealing to removal and replacement of synthetic stucco sections.  Therefore, it is best to catch any possibility of water damage to EIFS at the earliest stage possible, before any lingering moisture has had time to cause rotting.
This article is from InterNACHI and can be found at https://www.nachi.org/water-damage-eifs.htm.

by Nick Gromicko, CMI® and Margaret Aey

A window well is semi-circular excavation that surrounds a basement window. It is typically constructed from a solid barrier made from corrugated galvanized metal, masonry, plastic or pressure-treated wood.

Window wells are usually installed for the following purposes:
  • emergency egress. If the window serves a living area — as opposed to an unfinished basement with exposed utilities (see our article on Non-Conforming Bedrooms) — emergency escape at a minimum of two locations is required. Window wells allow windows to be used by escaping occupants and emergency crews attempting to enter the house;
  • to prevent moisture damage to basement windows that are at or below grade. The window wells keep the soil away from openings in the foundation walls while still allowing proper grading and drainage away from the house; and
  • to allow sunlight into a below-grade room that would otherwise require artificial lighting.

Window Well Covers

Window wells are often covered to prevent injuries and falls, as well as to discourage small children,pets and wild animals from entering the wells and becoming injured and trapped. For instance, a deer fawn made news in Bountiful, Utah, after it was recovered safely after falling down a 12-foot-deep uncovered window well.   Although not required, window well covers are especially important if the space around the ground level opening is along a walkway or near a children’s play area.

Regarding their strength and operability, the 2007 edition of the International Code Council (ICC), Section 3.4, states that window well covers shall support “a minimum live load of 40 pounds per square foot. The cover shall be operable from within the window well without the use of tools or special knowledge, and shall require no more than 30 pounds of force to fully open.” These requirements ensure that an average-size adult would be able to pass through the window well safely during an emergency evacuation.

window well from home inspection near spearfish sd

Covers (like the ones pictured above and built by the author out of polycarbonate sheets and Unistrut®) also prevent the accumulation of twigs, grass, mulch and blowing snow that would obscure sunlight and complicate emergency escape through the well. Covers may be locked from the inside to prevent unwanted intrusion.  However, locks and fasteners must be fully functional to be certain that the cover can be easily lifted from the inside.

window well from home inspection near spearfish sd

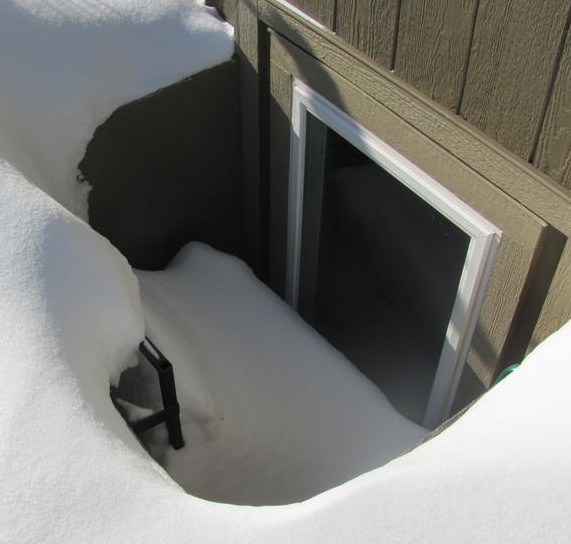
Window well covers, however, can block sunlight, ventilation and emergency egress, especially if they become covered in snow and ice. It is the homeowner’s responsibility to make sure that the cover is cleared of snow and has not been frozen shut from ice. No items, such as garden hoses, potted plants or tools, should be placed on top of window well covers. Note that covers that are locked from the inside to prevent unlawful entry will be inaccessible to fire crews and first responders.
Construction 
Window well covers should be constructed from sturdy, high-quality material, such as plastic or metal. A window well cover that is made from metal (typically, aluminum or steel) is referred to as a grate and is implemented to protect against intrusion. Since metal grate covers have small openings, sometimes a plastic cover is installed over the metal grate to further prevent leakage and debris from entering the window well. In either case, the cover must fit over the entire opening, so it’s common for them to be custom-fitted.
Additional safety concerns include the following:
  • size. According to the 2006 edition of the International Residential Code (IRC), Section R310:The minimum horizontal area of the window well shall be 9 square feet, with a minimum horizontal projection and width of 36 inches.Even if the well seems large enough for members of a particular household, it might be a tight fit for a fully equipped firefighter;
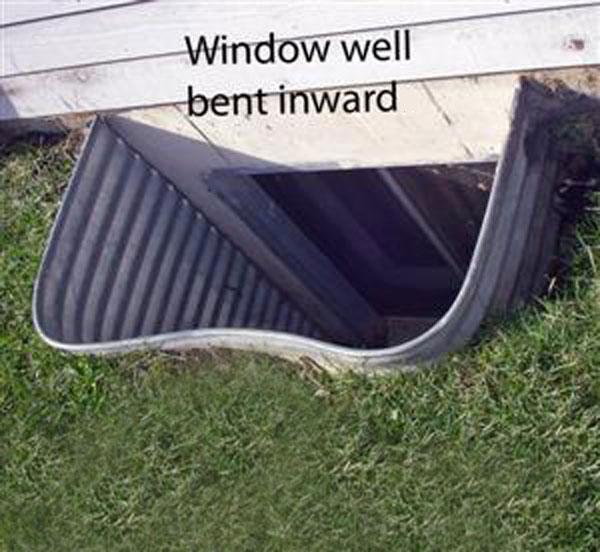
  • structural damage to the barrier. Hydrostatic pressure and freeze-thaw cycles can exert a great deal of pressure on window wells and, over time, cause masonry to bend or crack. Check for:
    • spalling, bowing, cracking or leaning in concrete; window well full of snow from home inspection near spearfish sd
    • cracking or bowing in plastic;
    • rust, bowing or rupture in metal; and
    • insect damage or cracks in wood.
  • improper drainage. Waterlogged window wells can easily leak through a window into the basement, especially following a heavy rain. Water intrusion can cause a variety of undesirable conditions, such as mold growth, wood decay, corrosion and insect damage. Check for a lack of sufficient cleaning and maintenance both in the window well and elsewhere. Homeowners should first make sure that gutters and downspouts are clear of debris, which can force water to overflow from the gutters and collect in the window well and other low areas. Dirt and debris should also be collected from the well. A qualified professional may be required to correct structural sources of drainage issues, such as soil erosion, insufficient or settled drainage stone, or the pulling away from the foundation of the barrier; and
  • lack of a ladder. The 2006 IRC, Section 310.2, states:Window wells with a vertical depth greater than 44 inches shall be equipped with a permanently affixed ladder or steps usable with the window in the fully open position.
    bent window well from home inspection near spearfish sd

Additional Tips for Homeowners

  • Window well covers can be screened or barred to provide pest-free ventilation.
  • Teach children to avoid window wells, even if they are covered and appear sturdy.
  • Practice exiting the window, window well and window cover so that any previously unnoticed obstacles can be removed. Repair or replace any equipment that does not function properly.
  • Speak with your local building department if you are unsure whether a window well is required in your home. Your jurisdiction may mandate special size restrictions.
  • Metal window wells can have rolled edges for safety against cuts.
  • Consult with your InterNACHI® inspector if you have additional concerns surrounding window wells, covers, moisture problems and emergency egress.
In summary, window wells are installed to allow emergency egress and to protect windows from damp soil, but improper installation and maintenance can lead to moisture damage and safety hazards, especially in an emergency.  Additionally, window well covers can be installed over window well openings to eliminate the risk of children, animals, and pedestrians from falling into the window well excavation.  This article is from InterNACHI and can be found at https://www.nachi.org/window-well-inspection.htm.

by Nick Gromicko, CMI®


Carbon monoxide (CO) is a colorless, odorless, poisonous gas that forms from incomplete combustion of fuels, such as natural or liquefied petroleum gas, oil, wood or coal.

Facts and Figures

  • 480 U.S. residents died between 2001 and 2003 from non-fire-related carbon-monoxide poisoning.
  • Most CO exposures occur during the winter months, especially in December (including 56 deaths, and 2,157 non-fatal exposures), and in January (including 69 deaths and 2,511 non-fatal exposures). The peak time of day for CO exposure is between 6 and 10 p.m.
  • Many experts believe that CO poisoning statistics understate the problem. Because the symptoms of CO poisoning mimic a range of common health ailments, it is likely that a large number of mild to mid-level exposures are never identified, diagnosed, or accounted for in any way in carbon monoxide statistics.
  • Out of all reported non-fire carbon-monoxide incidents, 89% or almost nine out of 10 of them take place in a home.

Physiology of Carbon Monoxide Poisoning

When CO is inhaled, it displaces the oxygen that would ordinarily bind with hemoglobin, a process the effectively suffocates the body. CO can poison slowly over a period of several hours, even in low concentrations. Sensitive organs, such as the brain, heart and lungs, suffer the most from a lack of oxygen.

High concentrations of carbon monoxide can kill in less than five minutes. At low concentrations, it will require a longer period of time to affect the body. Exceeding the EPA concentration of 9 parts per million (ppm) for more than eight hours may have adverse health affects. The limit of CO exposure for healthy workers, as prescribed by the U.S. Occupational Health and Safety Administration, is 50 ppm.

Potential Sources of Carbon Monoxide

Any fuel-burning appliances which are malfunctioning or improperly installed can be a source of CO, such as:

  • furnaces;
  • stoves and ovens;
  • water heaters;
  • dryers;
  • room and space heaters;
  • fireplaces and wood stoves;
  • charcoal grills;
  • automobiles;
  • clogged chimneys or flues;
  • space heaters;
  • power tools that run on fuel;
  • gas and charcoal grills;
  • certain types of swimming pool heaters; and
  • boat engines.
PPM   % CO
in air 
Health Effects in Healthy Adults  Source/Comments 
0 0% no effects; this is the normal level in a properly operating heating appliance
35 0.0035% maximum allowable workplace exposure limit for an eight-hour work shift The National Institute for Occupational Safety and Health (NIOSH)
50 0.005% maximum allowable workplace exposure limit for an eight-hour work shift               OSHA
100 0.01% slight headache, fatigue, shortness of breath,
errors in judgment
125 0.0125% workplace alarm must sound (OSHA)
200 0.02% headache, fatigue,
nausea, dizziness
400 0.04% severe headache, fatigue, nausea, dizziness, confusion; can be life-threatening after three hours of exposure evacuate area immediately
800 0.08% convulsions, loss of consciousness;
death within three hours
evacuate area immediately
12,000 1.2% nearly instant death

CO Detector Placement
CO detectors can monitor exposure levels, but do not place them:

  • directly above or beside fuel-burning appliances, as appliances may emit a small amount of carbon monoxide upon start-up;
  • within 15 feet of heating and cooking appliances, or in or near very humid areas, such as bathrooms;
  • within 5 feet of kitchen stoves and ovens, or near areas locations where household chemicals and bleach are stored (store such chemicals away from bathrooms and kitchens, whenever possible);
  • in garages, kitchens, furnace rooms, or in any extremely dusty, dirty, humid, or greasy areas;
  • in direct sunlight, or in areas subjected to temperature extremes. These include unconditioned crawlspaces, unfinished attics, un-insulated or poorly insulated ceilings, and porches;
  • in turbulent air near ceiling fans, heat vents, air conditioners, fresh-air returns, or open windows. Blowing air may prevent carbon monoxide from reaching the CO sensors.

Do place CO detectors:

  • within 10 feet of each bedroom door and near all sleeping areas, where it can wake sleepers. The Consumer Product Safety Commission (CPSC) and Underwriters Laboratories (UL) recommend that every home have at least one carbon monoxide detector for each floor of the home, and within hearing range of each sleeping area;
  • on every floor of your home, including the basement (source:  International Association of Fire Chiefs/IAFC);
  • near or over any attached garage. Carbon monoxide detectors are affected by excessive humidity and by close proximity to gas stoves (source:  City of New York);
  • near, but not directly above, combustion appliances, such as furnaces, water heaters, and fireplaces, and in the garage (source:  UL); and
  • on the ceiling in the same room as permanently installed fuel-burning appliances, and centrally located on every habitable level, and in every HVAC zone of the building (source:  National Fire Protection Association 720). This rule applies to commercial buildings.

In North America, some national, state and local municipalities require installation of CO detectors in new and existing homes, as well as commercial businesses, among them:  Illinois, Massachusetts, Minnesota, New Jersey, Vermont and New York City, and the Canadian province of Ontario. Installers are encouraged to check with their local municipality to determine what specific requirements have been enacted in their jurisdiction.

How can I prevent CO poisoning?

  • Purchase and install carbon monoxide detectors with labels showing that they meet the requirements of the new UL standard 2034 or Comprehensive Safety Analysis 6.19 safety standards.
  • Make sure appliances are installed and operated according to the manufacturer’s instructions and local building codes. Have the heating system professionally inspected by an InterNACHI inspector and serviced annually to ensure proper operation. The inspector should also check chimneys and flues for blockages, corrosion, partial and complete disconnections, and loose connections.
  • Never service fuel-burning appliances without the proper knowledge, skill and tools. Always refer to the owner’s manual when performing minor adjustments and when servicing fuel-burning equipment.
  • Never operate a portable generator or any other gasoline engine-powered tool either in or near an enclosed space, such as a garage, house or other building. Even with open doors and windows, these spaces can trap CO and allow it to quickly build to lethal levels.
  • Never use portable fuel-burning camping equipment inside a home, garage, vehicle or tent unless it is specifically designed for use in an enclosed space and provides instructions for safe use in an enclosed area.
  • Never burn charcoal inside a home, garage, vehicle or tent.
  • Never leave a car running in an attached garage, even with the garage door open.
  • Never use gas appliances, such as ranges, ovens or clothes dryers to heat your home.
  • Never operate un-vented fuel-burning appliances in any room where people are sleeping.
  • During home renovations, ensure that appliance vents and chimneys are not blocked by tarps or debris. Make sure appliances are in proper working order when renovations are complete.
  • Do not place generators in the garage or close to the home. People lose power in their homes and get so excited about using their gas-powered generator that they don’t pay attention to where it is placed. The owner’s manual should explain how far the generator should be from the home.
  • Clean the chimney. Open the hatch at the bottom of the chimney to remove the ashes.  Hire a chimney sweep annually.
  • Check vents. Regularly inspect your home’s external vents to ensure they are not obscured by debris, dirt or snow.

In summary, carbon monoxide is a dangerous poison that can be created by various household appliances. CO detectors must be placed strategically throughout the home or business in order to alert occupants of high levels of the gas.  This article is from InterNACHI and can be found at https://www.nachi.org/carbon-monoxide.htm.

Schedule your home inspection with Red Horse Home Inspection.  Follow us on Facebook and Instagram.

by Nick Gromicko, CMI® and Kenton Shepard
Between approximately 1965 and 1973, single-strand (solid) aluminum wiring was sometimes substituted for copper branch-circuit wiring in residential electrical systemsAluminum and copper wiring, with each metal clearly identifiable by its color something to look for during a home inspection due to the sudden escalating price of copper. After a decade of use by homeowners and electricians, inherent weaknesses were discovered in the metal that lead to its disuse as a branch wiring material. Aluminum will become defective faster than copper due to certain qualities inherent in the metal. Neglected connections in outlets, switches and light fixtures containing aluminum wiring become increasingly dangerous over time. Poor connections cause wiring to overheat, creating a potential fire hazard. In addition, the presence of single-strand aluminum wiring may void a home’s insurance policies. Inspectors may instruct their clients to talk with their insurance agents about whether the presence of aluminum wiring in their home is a hazard, a defect, and a problem that requires changes to their policy language.
According to the InterNACHI Home Inspection Standards of Practice, a home inspector is required to report upon single-strand, solid conductor aluminum branch-circuit wiring, if observed by the home inspector.
Facts and Figures 
 
  • On April, 28, 1974, two people were killed in a house fire in Hampton Bays, New York. Fire officials determined that the fire was caused by a faulty aluminum wire connection at an outlet.
  • According to the Consumer Product Safety Commission (CPSC), “Homes wired with aluminum wire manufactured before 1972 [‘old technology’ aluminum wire] are 55 times more likely to have one or more connections reach “Fire Hazard Conditions” than is a home wired with copper.”
Aluminum as a Metal

Aluminum possesses certain qualities that, compared with copper, make it an undesirable material as an electrical conductor. These qualities all lead to loose connections, where fire hazards become likely. These qualities are as follows:

  • higher electrical resistance. Aluminum has a high resistance to electrical current flow, which means that, given the same amperage, aluminum conductors must be of a larger diameter than would be required by copper conductors.
  • less ductile. Aluminum will fatigue and break down more readily when subjected to bending and other forms of abuse than copper, which is more ductile. Fatigue will cause the wire to break down internally and will increasingly resist electrical current, leading to a buildup of excessive heat.
  • galvanic corrosion.  In the presence of moisture, aluminum will undergo galvanic corrosion when it comes into contact with certain dissimilar metals.
  • oxidation. Exposure to oxygen in the air causes deterioration to the outer surface of the wire. This process is called oxidation. Aluminum wire is more easily oxidized than copper wire, and the compound formed by this process – aluminum oxide – is less conductive than copper oxide. As time passes, oxidation can deteriorate connections and present a fire hazard.
  • greater malleability. Aluminum is soft and malleable, meaning it is highly sensitive to compression. After a screw has been over-tightened on aluminum wiring, for instance, the wire will continue to deform or “flow” even after the tightening has ceased. This deformation will create a loose connection and increase electrical resistance in that location.
  • greater thermal expansion and contraction. Even more than copper, aluminum expands and contracts with changes in temperature. Over time, this process will cause connections between the wire and the device to degrade. For this reason, aluminum wires should never be inserted into the “stab,” “bayonet” or “push-in” type terminations found on the back of many light switches and outlets.
  • excessive vibration. Electrical current vibrates as it passes through wiring. This vibration is more extreme in aluminum than it is in copper, and, as time passes, it can cause connections to loosen.

Identifying Aluminum Wiring

  • Aluminum wires are the color of aluminum and are easily discernible from copper and other metals.
  • Since the early 1970s, wiring-device binding terminals for use with aluminum wire have been marked CO/ALR, which stands for “copper/aluminum revised.”
  • Look for the word “aluminum” or the initials “AL” on the plastic wire jacket. Where wiring is visible, such as in the attic or electrical panel, inspectors can look for printed or embossed letters on the plastic wire jacket. Aluminum wire may have the word “aluminum,” or a specific brand name, such as “Kaiser Aluminum,” marked on the wire jacket. Where labels are hard to read, a light can be shined along the length of the wire.
  • When was the house built? Homes built or expanded between 1965 and 1973 are more likely to have aluminum wiring than houses built before or after those years.

Options for Correction

Aluminum wiring should be evaluated by a qualified electrician who is experienced in evaluating and correcting aluminum wiring problems. Not all licensed electricians are properly trained to deal with defective aluminum wiring. The CPSC recommends the following two methods for correction for aluminum wiring:

  • Rewire the home with copper wire. While this is the most effective method, rewiring is expensive and impractical, in most cases.
  • Use copalum crimps. The crimp connector repair consists of attaching a piece of copper wire to the existing aluminum wire branch circuit with a specially designed metal sleeve and powered crimping tool. This special connector can be properly installed only with the matching AMP tool. An insulating sleeve is placed around the crimp connector to complete the repair. Although effective, they are expensive (typically around $50 per outlet, switch or light fixture).

Although not recommended by the CPSC as methods of permanent repair for defective aluminum wiring, the following methods may be considered:

  • application of anti-oxidant paste. This method can be used for wires that are multi-stranded or wires that are too large to be effectively crimped.
  • pigtailing. This method involves attaching a short piece of copper wire to the aluminum wire with a twist-on connector. the copper wire is connected to the switch, wall outlet or other termination device. This method is only effective if the connections between the aluminum wires and the copper pigtails are extremely reliable. Pigtailing with some types of connectors, even though Underwriters Laboratories might presently list them for the application, can lead to increasing the hazard. Also, beware that pigtailing will increase the number of connections, all of which must be maintained. Aluminum Wiring Repair (AWR), Inc., of Aurora, Colorado, advises that pigtailing can be useful as a temporary repair or in isolated applications, such as the installation of a ceiling fan.
  • CO/ALR connections. According to the CPSC, these devices cannot be used for all parts of the wiring system, such as ceiling-mounted light fixtures or permanently wired appliances and, as such, CO/ALR connections cannot constitute a complete repair. Also, according to AWR, these connections often loosen over time.
  • alumiconn. Although AWR believes this method may be an effective temporary fix, they are wary that it has little history, and that they are larger than copper crimps and are often incorrectly applied.
  • Replace certain failure-prone types of devices and connections with others that are more compatible with aluminum wire.
  • Remove the ignitable materials from the vicinity of the connections.

In summary, aluminum wiring can be a fire hazard due to inherent qualities of the metal. Inspectors should be capable of identifying this type of wiring. This article in from InterNACHI and can be found at https://www.nachi.org/aluminum-wiring.htm.

Schedule your home inspection with Red Horse Home Inspection. Follow us on Facebook and Instagram.

by Nick Gromicko, CMI®


A room must conform to specific requirements in order for it to be considered a bedroom or sleeping room. The reason for this law is that the inhabitant must be able to quickly escape in case of fire or another emergency.

Why would a homeowner use a non-conforming room as a bedroom?Non-conforming window found during home inspection near sturgis sd  Some of the reasons include:
  • to earn money from it as a rental. While they run the risk of being discovered by the city, landlords will profit by renting out rooms that are not legally bedrooms;
  • to increase the value of the home. All other considerations being equal, a four-bedroom house will usually sell for more than a three-bedroom house; and
  • lack of knowledge of code requirements. To the untrained eye, there is little obvious difference between a conforming bedroom and non-conforming bedroom. When an emergency happens, however, the difference will be more apparent. If you have any questions about safety requirements, ask your InterNACHI inspector during your next scheduled inspection.

Homeowners run serious risks when they use a non-conforming room as a bedroom. An embittered tenant, for instance, may bring their landlord to court, especially if the tenant was forced out when the faux bedroom was exposed. The landlord, upon being exposed, might choose to adjust the bedroom to make it code-compliant, but this can cost thousands of dollars. Landlords can also be sued if they sell the home after having advertised it as having more bedrooms than it actually has. And the owner might pay more than they should be paying in property tax if they incorrectly list a non-conforming bedroom as a bedroom. Perhaps the greatest risk posed by rooms that unlawfully serve as bedrooms stems from the reason these laws exist in the first place:  rooms lacking egress can be deadly in case of an emergency. For instance, on January 5, 2002, four family members sleeping in the basement of a Gaithersburg, Maryland, townhome were killed by a blaze when they had no easy escape.

The following requirements are taken from the 2006 International Residential Code (IRC), and they can be used as a general guide, but bear in mind that the local municipality determines the legal definition of a bedroom. Such local regulations can vary widely among municipalities, and what qualifies as a bedroom in one city might be more properly called a den in a nearby city. In some municipalities, the room must be above grade, be equipped with an AFCI or smoke alarm to be considered a conforming bedroom, for instance. Ceiling height and natural lighting might also be factors. The issue can be extremely complex, so it’s best to learn the code requirements for your area. Nevertheless, the IRC can be useful, and it reads as follows:

  • EMERGENCY ESCAPE AND RESCUE REQUIRED SECTION: R 310.1 Basements and every sleeping room shall have at least one operable emergency and rescue opening. Such opening shall open directly into a public street, public alley, yard or court. Where basements contain one or more sleeping rooms, emergency egress and rescue openings shall be required in each sleeping room, but shall not be required in adjoining areas of the basement. Where emergency escape and rescue openings are provided, they shall have a sill height of not more than 44 inches (1,118mm) above the floor. Where a door opening having a threshold below the adjacent ground elevation serves as an emergency escape and rescue opening and is provided with a bulkhead enclosure, the bulkhead enclosure shall comply with SECTION R310.3. The net clear opening dimensions required by this section shall be obtained by the normal operation of the emergency escape and rescue opening from the inside. Emergency escape and rescue openings with a finished sill height below the adjacent ground elevation shall be provided with a window well, in accordance with SECTION R310.2.  
    • MINIMUM OPENING AREA: SECTION: R 310.1.1 All emergency escape and rescue openings shall have a minimum net clear opening of 5.7 square feet (0.530 m2). Exception: Grade floor openings shall have a minimum net clear opening of 5 square feet (0.465 m2).
    • MINIMUM OPENING HEIGHT: R 310.1.2 The minimum net clear opening height shall be 24 inches (610mm).
    • MINIMUM OPENING WIDTH: R 310.1.3 The minimum net clear opening width shall be 20 inches (508mm).
    • OPERATIONAL CONSTRAINTS: R 310.1.4 Emergency escape and rescue openings shall be operational from the inside of the room without the use of keys or tools or special knowledge.
  • WINDOW WELLS: SECTION: R310.2 The minimum horizontal area of the window well shall be 9 square feet (0.9 m2), with a minimum horizontal projection and width of 36 inches (914mm). The area of the window well shall allow the emergency escape and rescue opening to be fully opened. Exception: The ladder or steps required by SECTION R 310.2.1 shall be permitted to encroach a maximum of 6 inches (152mm) into the required dimensions of the window well.
  • LADDER AND STEPS: SECTION: R 310.2.1 Window wells with a vertical depth greater than 44 inches (1,118mm) shall be equipped with a permanently affixed ladder or steps usable with the window in the fully open position. Ladders or steps required by this section shall not be required to comply with SECTIONS R311.5 and R311.6. Ladders or rungs shall have an inside width of at least 12 inches (305 mm), shall project at least 3 inches (76mm) from the wall, and shall be spaced not more than 18 inches (457mm) on-center vertically for the full height of the window well.
  • BULKHEAD ENCLOSURES: SECTION: R 310.3 Bulkhead enclosures shall provide direct access to the basement. The bulkhead enclosure with the door panels in the fully open position shall provide the minimum net clear opening required by SECTION R 310.1.1. Bulkhead enclosures shall also comply with SECTION R 311.5.8.2.
  • BARS, GRILLS, COVERS, AND SCREENS: SECTION: R 310.3 Bars, grilles, covers, screens or similar devices are permitted to be placed over emergency escape and rescue openings, bulkhead enclosures, or window wells that serve such openings, provided the minimum net clear opening size complies with SECTIONS R 310.1.1 to R 310.1.3, and such devices shall be releasable or removable from the inside without the use of a key, tool, special knowledge, or force greater than that which is required for normal operation of the escape and rescue opening.
  • EMERGENCY ESCAPE WINDOWS UNDER DECKS AND PORCHES: SECTION: R 310.5 Emergency escape windows are allowed to be installed under decks and porches, provided the location of the deck allows the emergency escape window to be fully opened and provides a path not less than 36 inches (914 mm) in height to a yard or court.
In summary, non-conforming bedrooms are rooms that unlawfully serve as bedrooms, as the occupant would lack an easy escape in case of emergency.  This article is from InterNACHI and can be found at
Follow Red Horse Home Inspection on Facebook and Instagram.

by Nick Gromicko, CMI®

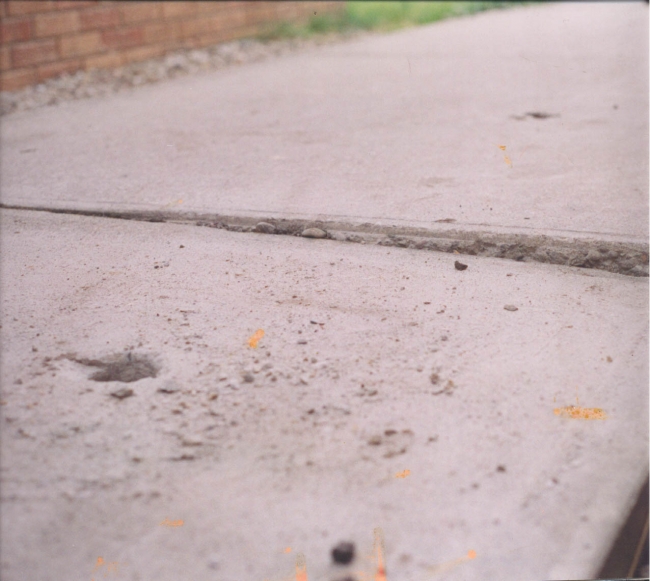
There was a time when the only remedy for sinking sidewalks or uneven foundations was to tear out the old pavement slab and pour a new one, and spend a great deal of time and money in the process. Today, a less intensive alternative known as mudjacking (also called concrete leveling, pressure grouting or slabjacking) pumps A sunken concrete sidewalk in desperate need of repair found during a home inspection near rapid city sdslurry beneath a sunken concrete slab in order to raise it back into place.

Concrete sinks because its underlying support, for various reasons, gives way. The original concrete may have been installed on dirt that hadn’t been compacted sufficiently, for instance, or soil erosion may be responsible. And some soil simply settles naturally over many years. Regardless of the cause, sunken concrete can lead to many structural defects, including failed retaining walls, foundation settling, uneven junctions of concrete, sunken sidewalks, uneven concrete pads, cracked foundations, and bowed basement walls. If left uncorrected, these defects can lead to unwanted water runoff and major structural problems.

And, aside from the shabby appearance and decreased functionality of an uneven sidewalk, steps or walkway, sunken concrete can create major trip hazards for which the building owner is liable. If a building owner notices any of these conditions, they should consult with their InterNACHI inspector during their next scheduled inspection.

Process
First, small holes are drilled into the concrete, through which is pumped a slurry that may be composed of various materials, such as sand, cement, soil, limestone, bentonite clay, water or expanding polymers. The particular mixture is based on the type of application and the mudjacker’s preference. The slurry then fills any gaps and forces the concrete to rise back into place before the drilled holes are plugged up with cement, leaving the only visible evidence of the repair. Over the next day, the slurry solidifies and stabilizes the subsoil, making further sinking unlikely.

While this is not a complicated procedure, it should be performed only by a trained professional, as amateur workmanship may cause even more extensive damage. Drain pipes, sewers and utilities must be located and avoided, and the area must be evaluated as to whether it can survive the mudjacking process.

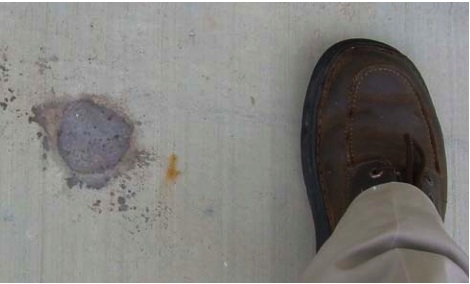
Some advantages of mudjacking over re-pouring cement include:The only evidence left of mudjacking is the patched hole through which the slurry was pumped. from a home inspection
  • efficiency. Mudjacking requires less equipment and fewer workers. Adjacent plants and landscaping are also disturbed less, as are neighbors, tenants and passersby by the loud noise, dust and cumbersome equipment;
  • price. Mudjacking typically costs roughly half as much as concrete replacement because there is little need for new cement or the removal of old concrete. The overall cost is based on the area of concrete that must be lifted, which may be as little as $5 per foot. Thus, for a 5×4-foot job, it might cost just $60, although the mudjacker may charge more if the area is in a hard-to-reach location;
  • speed. Mudjacking takes hours, while certain concrete pours may take days; and
  • environmentally friendly. Mudjacking makes use of perfectly good concrete, which would otherwise be sent to a landfill.
Limitations of Mudjacking
Mudjacking may be an ineffective waste of resources in the following situations:
  • The concrete surface is spalling or otherwise damaged. The mudjacking process might further damage the surface, which will still be defective even after it’s raised back into place.
  • The concrete has risen, caused by expansive soil. The only solution for this defect is to re-pour the cement.
  • The cause of the settling is not addressed. If the soil has settled due to some external factor, the problem must be fixed or the soil will sink again in the future. For instance, a gutter downspout that drains onto a concrete edge must be corrected in order to avoid the need for future repair.
  • The underlying soil is swampy.
  • There is a sinkhole beneath the concrete.
In summary, mudjacking is an inexpensive, fast and clean way to level a sunken concrete slab. This article is from InterNACHI and can be found at https://www.nachi.org/mudjacking.htm.
Follow us on Facebook and Instagram for home maintenance and safety tips.

What is a home inspection?

A home inspection is a visual examination of the home’s major structure, systems and components that are visible and safely accessible.  The inspector should substantially adhere to a standards of practice that outlines what should be covered during a general home inspection, as well as what is excluded. Some inspectors may strictly follow the standards of practice, while others may exceed the standards and inspect other items, or perform a more detailed inspection. Whatever the inspector includes in his or her inspection should be discussed prior to the inspection – this is known as the scope of work. The inspector should be able to provide you with a copy or online link to the standards of practice they follow.  The inspector should provide you with a written report, which may include photos and/or recommendations, of his or her findings of the inspection.  Read InterNACHI’s Standards of Practice to find out what is typically included and excluded in a home inspection.

Why should I get a home inspection?

home inspector inspecting furnace rapid city sd spearfishBuying a home is typically the biggest investment you will ever make, so it’s important to get a home inspection because the inspector should be able to discover and document defects that may or may not be obvious to you as a prospective buyer.  Such defects can range from simple replacements or repairs, to severe damage or safety and health concerns. Additionally, most mortgage companies require a home inspection on a property before approving the home loan. Read InterNACHI’s Top 10 Reasons to Get a Home Inspection.

Where can I find a home inspector in my area?

There are several ways to find a home inspector. You may be able to find one online or in local ads. You may also find inspectors’ brochures by visiting a real estate office. There is no single method that is superior when it comes to finding an inspector who’s right for your inspection needs.

Below are some online resources for finding a home inspector near you:

How can I be sure that a home inspector is qualified?

It is important to choose a home inspector who is qualified and holds a license or certification in the field. Many jurisdictions do not regulate home inspections, meaning that anyone could call themselves a home inspector. However, just because someone performs home inspections doesn’t mean that they’re actually qualified to do so. If you are buying or selling a home in an unregulated jurisdiction, make sure to look for a home inspector with the proper certifications. If you are located in a state or province that does require licensing of home inspectors, you should hire only a licensed professional.

Contact your state by phone or online to find out whether they license home inspectors, and what qualifications they’re required to have.  License numbers in licensing states may vary in appearance, but you should be able to independently verify it. If your state doesn’t require licensing, find out what qualifications and certifications your home inspector has. The International Association of Certified Home Inspectors – InterNACHI® – is the largest and most trusted home inspector association in the world.  Its members undergo rigorous training to become Certified Professional Inspectors (CPIs)®.  They also follow a Standards of Practice and adhere to a Code of Ethics.  Also, the Master Inspector Certification Board grants qualified inspectors the title of Certified Master Inspector® (CMI®), which is the highest professional designation in the inspection industry.  Find out if your inspector is licensed and/or a CPI or CMI® before you hire him or her. This will ensure that you are hiring only an individual who has received the best training to become a home inspector.

How much does a home inspection cost?

There is no set cost for a home inspection. The cost will vary based on the inspector, the local market, the geographic region, the scope of the inspection to be performed, and more. Before the inspection, you should find out what will be included in the inspection and what won’t, and these details should also be outlined in the inspection agreement that you will need to sign prior to the inspection.

How long does a home inspection take?

Depending on the home’s age, size, and location, as well as the home inspector’s own work protocols and ethic, your home inspection may take up to three hours. Adding square footage, outbuildings, and/or ancillary services (such as mold or radon testing) will increase that time. It may be necessary for your inspector to bring in a helper for a very large property. If your general home inspection takes significantly less than two to three hours, it may indicate that the inspector was not thorough enough.

At what point in the real estate transaction should I schedule a home inspection?

A home inspection is usually scheduled after an offer has been made and accepted, but before the closing date. That way, the inspector can rule out any major defects that could be dangerous or costly. In rare cases—due to timing or contractual issues—the inspection can be scheduled after the closing date. If this is the case, the home buyer should schedule the inspection for the earliest possible date after closing.

Should I be present for the inspection?

You should attend the inspection, and you should reconsider hiring an inspector who doesn’t allow this. You can learn a lot by following an inspector through the home. You will certainly gain a better understanding of the home’s condition, which will give you insight into its potential sale points and defects. Additionally, you will likely learn information about the home’s maintenance, systems and components that may provide useful for the transaction.

Can the home inspector also repair any defects he or she finds?

What if your home inspector is also a licensed contractor? Sounds great, right? Not always. Although it may seem convenient to have an inspector who is also a contractor, it poses a conflict of interest. According to InterNACHI’s Code of Ethics:

The InterNACHI member shall not perform or offer to perform, for an additional fee, any repairs or associated services to the structure for which the member or member’s company has prepared a home inspection report for a period of 12 months. This provision shall not include services to components and/or systems that are not included in the InterNACHI Standards of Practice.

If an inspector financially benefits from finding any defects, this can impact the accuracy of the report (whether intentional or not). Make sure the inspector you hire abides by a Code of Ethics and Standards of Practice.
What happens if the inspection reveals problems?

If your home inspection reveals any problems, it is important to understand the severity of the defect. For example, a missing shingle or dirty air filter can be easily fixed at a low cost. However, if the defect is more extreme, such as a major foundation crack, wood-destroying organism infestation, or evidence of mold, you should find out how these problems can be addressed, and whether you can negotiate their cost with the seller. If it is determined after you move in that your home has a severe defect that wasn’t reported by your InterNACHI® Certified Professional Inspector®, you should check to see if he or she participates in InterNACHI’s “We’ll Buy Your Home Back” Guarantee.

What is the Buy-Back Guarantee and how does it work?

If your InterNACHI® Certified Professional Inspector® participates in the Buy-Back Guarantee, InterNACHI® will buy your home back if the inspector misses something on your inspection.

Here’s how this program works:

  • It’s valid for home inspections performed for home buyers only by participating InterNACHI® members.
  • The home must be listed for sale with a licensed real estate agent.
  • The Guarantee excludes homes with material defects not present at the time of the inspection, or not required to be inspected, per InterNACHI’s Residential Standards of Practice.
  • The Guarantee will be honored for 90 days after closing.
  • InterNACHI will pay you whatever price you paid for the home.

This article is from InterNACHI and can be found at https://www.nachi.org/home-inspection-faq-buyers-sellers.htm.

Schedule your home inspection with Red Horse Home Inspection.  Follow us on Facebook and Instagram.