by Nick Gromicko, CMI® and Kenton Shepard

Defensible space refers to the area surrounding a building that is mitigated to protect it from wildfires. Along with the quality of a building’s roofing material, adequate defensible space is one of the most important factors in determining a building’s ability to survive a wildfire. Inspectors should know enough about defensible space to educate their clients, particularly in fire-prone regions.
Defensible space performs the following functions:

  1. Ideally, a carefully maintained defensible space will not contain enough fuel to allow a wildfire to reach a house. Even if the space is breached, the fire will have been slowed and weakened, helping firefighters to defend the house.
  2. A defensible space provides an accessible area for fire trucks to park and firefighters to work during a structure fire.
  3. If there is a pond near a burning house, it can be used to replenish a fire truck’s water supply. The perimeter of the pond should be thinned of trees and brush sufficiently so that firefighters can access it.

The size requirements for defensible space vary by jurisdiction because the potential for wildfires varies by region. Buildings in forested areas of the Southwest need a much larger protective space than in New Jersey, for instance. As of 2006, California state law mandates a minimum of 100 feet of defensible space for houses in rural locations. Trees and shrubs surrounding a house should be trimmed and spaced apart a safe distance from one another. Chainsaws can be used to remove trees and branches, pruning shears to trim plants, and rakes for removing pine needles and other ground-level combustibles. Trees that are very close to the house should be removed because this is where fire-prevention is most critical. Vegetation can be plentiful towards the perimeter of the space if it is green and pruned.

Colorado State University divides defensible space into three categories in the following manner:

Zone 1:  The first 15 feet from a home should be devoid of all flammable vegetation. Firewood and other flammable materials should not be stored in this region.

Zone 2:  This area of fuel reduction should extend from Zone 1 outward to between 75 to 125 feet from the structure. Trees and large shrubs should be no less than 10 feet apart, especially in steep terrain. Trees must also be pruned to a height of 10 feet from the ground, and any “ladder fuels” (vegetation with vertical continuity) removed from the base of the trees. Grass, trees and shrubs in this region should be green and adequately spaced. Pine needles, dead leaves, branches, dead or dying vegetation and other flammable debris on the ground should be removed whenever they appear.

Zone 3:  This region of traditional forest management is of no particular size, although it normally extends to the property limits. More trees are permitted here than in Zone 2, although their health and vigor should be maintained.

Precautions That Inspectors Can Pass on to Their Clients
  • Homeowners should obey all environmental protection laws while creating and maintaining defensible spaces. In particular, removal of vegetation should not interfere with the well-being of endangered species, air and water quality, or archaeologically significant resources. Homeowners may need to obtain a permit to cut down trees over a certain size, depending on local jurisdictions.
  • Vegetation removal can cause soil erosion, especially in steep terrain. InterNACHI advises that in areas that are prone to wildfire and soil erosion, it can be helpful to replace highly flammable plants and trees with less-flammable alternatives.
In summary, buildings can be spared from wildfire damage through the removal of surrounding flammable vegetation. Defensible spaces are critical in hot, dry, forested regions, although their presence is recommended everywhere.  This article is from InterNACHI and can be found at https://www.nachi.org/defensible-space.htm.
Check out https://sdda.sd.gov/legacydocs/Forestry/publications/PDF/Living-With-Fire.pdf for more information on keeping your home safe from wildfires.
Red Horse Home Inspection is proud to service the Black Hills of South Dakota.  We are certified, licensed and insured.  We offer buyer and seller home inspections, radon gas testing, and water testing.  If you need a home inspection give us a call at 605-490-2916 or you can easily schedule online.  Please like and follow us on Facebook.  Check out a sample home inspection report here.

by Nick Gromicko, CMI®

Cisterns are tanks that store water for a variety of purposes, such as irrigation, fire suppression and drinking.Fiberglass cistern that you could find during a home inspection in the black hill
Uses
  • Potable water may be stored in cisterns for such purposes as drinking, bathing and dishwashing. Treated water may arrive from public water sources or filtered from rainwater in a catchment system.
  • Non-potable water can be stored for uses such as irrigation and washing cars.
  • Many communities have invested in large cisterns for fire-suppression purposes, some of which can hold more than three times as much water as a typical fire truck. The town of Littleton, New Hampshire, for instance, approved funding for the purchase of 21 cisterns, each with a capacity of 10,000 gallons, at a cost of $41,000 per tank.
Materials

Cisterns must be made from sturdy materials to support an immense water weight. One gallon of water weighs 8.3 pounds (3.7 kg), and each cubic foot of water weighs 62.4 pounds (28.3 kg). Wind loads may also take a toll on exposed elevated tanks. Some common materials used in cistern construction include:

  • reinforced concrete. Often the best investment, reinforced concrete is durable and may help neutralize water acidity.
  • reinforced concrete block. These have a tendency to leak at their joints.
  • metal. However, metal may corrode.
  • fiberglass. Fiberglass may have strength problems when buried. If above ground, fiberglass cisterns should be located in shaded areas to reduce the damaging effects of ultraviolet radiation.
  • wood. Wooden cisterns are generally not satisfactory, particularly when they are used below ground, because they are difficult to keep sealed.
Inspection

Cisterns, along with all their components and accessories, should undergo regular inspections. Replacement or repair of the unit as a whole, and any of its constituent parts and accessories, should subsequently be undertaken, if needed. The primary concern of a cistern inspection is to detect leaks, which can allow water to escape or contaminants to enter the tank. In addition, the following elements may be inspected:

  • roof catchment, to ensure that no particulate matter or other parts of the roof are entering the gutter and downspout. Rainwater picks up dust, soot, bird droppings, leaves and other foreign materials that add objectionable organisms, color and odor to the water. For this reason, inspect to make sure that overhanging trees are not part of the catchment system;
  • gutters and downspouts should be inspected to assure that no leaks or obstructions are occurring;Above-ground cistern connected to a roof gutter
  • runoff/overflow pipe, to check that overflow is draining in a non-erosive manner;
  • any accessories, such as a rain diverter, soaker hose, linking kit or additional guttering; and
  • cistern drains should not be interconnected with waste or sewer lines, as this may allow backflow contamination.
Maintenance

Maintenance requirements for cisterns are relatively few if they supply non-potable water. Cisterns designed for the drinking water supply have much higher maintenance requirements, such as biannual testing for water quality and filtering systems. The following maintenance guidelines can be followed for most types of cisterns:

  • Before a cistern is used, it should be cleaned and disinfected. After cleaning out any dirt and other debris accumulated during construction, scrub the interior with a bleach-water solution. Make sure that there is ample ventilation for the workers inside the cistern. After this treatment, hose down the interior until the chlorine odor disappears.
  • A cistern needs to be cleaned at least every five years. This might be needed more often where blowing dust, leaves and fireplace or stove ash fall on the roof. Inspecting and cleaning the gutters, downspout and filter will help to keep the cistern cleaner.
  • Keep manhole covers tight.
  • Repair leaks promptly with sealants. Portland cement paints and epoxy resins are available to seal cracks in concrete.
Placement

Although usually located underground, cisterns may be placed at ground level or on elevated stands either outdoors or within buildings. For safety and efficiency considerations, cisterns should be placed:

  • away from sewage lines or other sources of contamination;
  • as far away from trees as possible, as tree roots can crack cistern walls;
  • in areas that are sloped to drain surface water away from the cisterns;
  • near their catchments;
  • in firm ground to avoid settling, which can crack cistern walls; and
  • away from sources of heat.
In summary, cisterns are water storage tanks that must be maintained and inspected, especially if they supply potable water.  This article is from InterNACHI and can be found at https://www.nachi.org/cisterns.htm.
Red Horse Home Inspection LLC is proud to service the Black Hills of South Dakota.  We are certified, licensed, and insured.  We offer buyer and seller home inspections, radon gas testing, and water testing.  Red Horse Home Inspection performs inspections in Rapid City, Sturgis, Spearfish, Deadwood, Lead, Hot Springs, Custer, Hill City, Keystone, Hermosa, Rapid Valley, Summerset, Box Elder, New Underwood, and any where in between.  If you are ready to schedule your home inspection give us a call at 605-490-2916 or schedule online.  Follow us on Facebook.  Check out a sample home inspection report and the latest reviews.

by Nick Gromicko, CMI® and Kenton Shepard

Backflow is the reversal of the normal and intended direction of water flow in a water system. Devices and assemblies known as backflow preventers are installed to prevent backflow, which can contaminate potable water supplies.
Why is backflow a problem?

Backflow is a potential problem in a water system because it can spread contaminated water back through a distribution system. For example, backflow at uncontrolled cross connections (cross-connections are any actual or potential connection between the public water supply and a source of contamination or pollution) can allow pollutants or contaminants to enter the potable water system. Sickness can result from ingesting water that has been contaminated due to backflow.

Backflow may occur under the following two conditions:

back-pressure:
Back-pressure is the reverse from normal flow direction within a piping system as the result of the downstream pressure being higher than the supply pressure. This reduction in supply pressure occurs whenever the amount of water being used exceeds the amount of water being supplied (such as during water-line flushing, fire-fighting, or breaks in water mains).

back-siphonage:

Back-siphonage is the reverse from normal flow direction within a piping system that is caused by negative pressure in the supply piping (i.e., the reversal of normal flow in a system caused by a vacuum or partial vacuum within the water supply piping). Back-siphonage can occur when there is a high velocity in a pipe line, when there is a line repair or break that is lower than a service point, or when there is lowered main pressure due to high-water withdrawal rate (such as during fire-fighting or water-main flushing).
Atmospheric Vacuum Breakers backflow from home inspection near rapid city sd

Backflow prevention for residences is most commonly accomplished through the use of atmospheric vacuum breakers (AVBs). AVBs operate by allowing the entry of air into a pipe so that a siphon cannot form. AVBs are bent at 90 degrees and are usually composed of brass. Compared with backflow preventer assembles, AVBs are small, simple and inexpensive devices that require little maintenance or testing. They have long life spans and are suitable for residential purposes such as sprinkler systems. InterNACHI inspectors can check for the following:

  • The AVB must be at least 6 inches above any higher point downstream of the device. For this reason, they can never be installed below grade. Even if they are installed 6 inches above grade, inspectors should make sure that they are not installed less than 6 inches above some other point in the system downstream of the device.
  • The AVB cannot be installed in an enclosure containing air contaminants. If contaminated air enters the water piping, it can poison the potable water supply.
  • A shut-off valve should never be placed downstream of any AVB, as this would result in continuous pressure on the AVB.
  • AVBs cannot be subject to continuous pressure for 12 hours in any 24-hour period or they may malfunction.
  • Spillage of water from the top of the AVB is an indication that the device has failed and needs to be replaced.
Types of Backflow Preventer Assemblies

Some types of assemblies are common in commercial and agricultural applications but are rare for residential uses. The appropriate type of backflow preventer for any given application will depend on the degree of potential hazard. The primary types of backflow preventers appropriate for use at municipalities and utilities are:

  • double check valves:  These are commonly used in elevated tanks and non-toxic boilers. Double check-valve assemblies are effective against backflow preventer from home inspection near sturgis sdbackflow caused by back-pressure and back-siphonage and are used to protect the potable water system from low-hazard substances. Double-checks consist of two positive-seating check valves installed as a unit between two tightly closing shut-off valves, and are fitted with testcocks.
  • reduced pressure principle assemblies:  These are commonly used in industrial plants, hospitals, morgues, chemical plants, irrigation systems, boilers, and fire sprinkler systems. Reduced pressure principle assemblies (RPs) protect against back-pressure and back-siphonage of pollutants and contaminants. The assembly is comprised of two internally loaded, independently operating check valves with a mechanically independent, hydraulically dependent relief valve between them.
  • pressure vacuum breakers:  These are commonly used in industrial plants, cooling towers, laboratories, laundries, swimming pools, lawn sprinkler systems, and fire sprinkler systems. Pressure vacuum breakers use a check valve designed to close with the aid of a spring when water flow stops. Its air-inlet valve opens when the internal pressure is one psi above atmospheric pressure, preventing non-potable water from being siphoned back into the potable system. The assembly includes resilient, seated shut-off valves and testcocks.
Requirements for Testers and Inspectors
A number of organizations, such as the American Water Works Association (AWWA) and the American Backflow Prevention Association (ABPA) offer certification courses designed to train professionals to test backflow preventers. Requirements for training vary by jurisdiction. Inspection of backflow preventers requires knowledge of installation requirements, although inspectors are not required to become certified.
In summary, backflow preventers are designed to prevent the reverse flow of water in a potable water system. They come in a number of different types, each of which is suited for different purposes.   This article is from InterNACHI and can be found at https://www.nachi.org/backflow-prevention.htm.

Red Horse Home Inspection of the Black Hills.

Red Horse Home Inspection is proud to service the Black Hills area.  We offer buyer and seller home inspections, radon gas testing, and water testing.  Our home inspector is licensed in the state of South Dakota and is an InterNACHI Certified Professional Inspector.  Our service area includes Rapid City, Sturgis, Spearfish, Deadwood, Custer, Hot Springs, Hermosa, Black Hawk, Summerset, Box Elder, New Underwood, and everywhere in between.  If you are buying or selling in the Black Hills please give us a call at 490-2916 or if you are ready to schedule your inspection you can do it online.  Please follow us on Facebook.  Check out a sample home inspection report and see the latest reviews.  Take a look at Red Horse Home Inspection’s Google My Business page.

by Nick Gromicko, CMI® and Kenton Shepard

Sump pumps are self-activating electrical pumps that protect homes from moisture intrusion. They are usually installed below basement or crawlspace floors to remove rising groundwater and surface runoff before it has a chance to seep into the home. Accumulated water can cause interior damage and encourage the growth of mold, mildew, and fungus. Pumps should be maintained and equipped with all necessary components in order to ensure their reliability.

How a Sump Pump Works

A pit, known as a sump pit or sump trench, can be dug at the lowest part of the basement floor to capture and contain any flowing water. A sump pump sits at the bottom of this trench (or beside it) and expels excess water through a series of interconnected pipes to a suitable discharge location. The pump can sense water levels through a float that rises and falls with fluctuating water levels in the trench. The sump pump becomes activated and deactivated based on the height of the float, providing a simple, automated way to monitor and deal with variable water levels.
Types of Sump Pumps
  • Pedestal sump pumps sit above the water line beside the sump trench and are not designed to get wet. Since they are not contained within the sump pit, they can be accessed easily but are also very noisy. They cost roughly $60 to $200, which is significantly less than other varieties.
  • Submersible sump pumps rest underwater at the bottom of the sump pit, and are much quieter than pedestal pumps. Their oil-cooled motors and tight seals protect against water and dust and afford them a long lifespan. They can cost up to $600.
  • Water-powered sump pumps are normally used as backups and kick in when the main pump experiences an electrical or mechanical failure.
Maintenance
  • The pump must be kept clean and free of debris. The inlet screen prevents the passage of dirt and other solid material from entering the pump, but it can become overwhelmed. Cleanings should occur often for pumps that run constantly.
  • Inspectors should make sure that the float is not tangled or jammed in one position. A sump pump with a jammed float is useless because it will not sense when it should turn on and shut off.
  • The pump can be tested by pouring water into the pit to make sure it becomes activated and expels the water. The homeowner should seek professional assistance if the pump does not activate.
  • Maintenance should take place annually, and when the home is sold.
  • When testing the pump, no one should ever reach into the pit. The float can be reached and manipulated with a household item such as a golf club (with a rubber handle) or anything else non-conductive that happens to be lying around.
Inspectors should check for the presence of the following:
  • a GFCI. There is considerable debate among inspectors concerning whether or not a sump pump should be connected to a GFCI. It is possible that a GFCI can prevent electrocution, but it is extremely unlikely that a sump pump will energize water in the first place. It is much more likely that a GFCI will trip during safe conditions and deactivate the sump pump when it is needed. A sump pump is among the most critical of all household appliances, and its deactivation, especially if the tenants are not home, could allow catastrophic building damage. Codes recommend that appliances in basements and crawlspaces be connected to GFCIs to reduce the chance of electrical shock, but this advice is often ignored due to these concerns over nuisance tripping.
  • an alarm. Sump pumps can burn out, lose power, become clogged or misaligned, or malfunction in a variety of other ways. It is valuable to have a warning device installed that will signal water build-up. These alarms can alert homeowners or neighbors of flooding so that it can be resolved before water damage occurs. Alarms are especially important in residences that are not occupied for long periods of time. Inspectors should keep in mind that, while an alarm can be helpful, it is not a requirement.
  • a check valve. This device is the same diameter as the discharge pipe into which it fits and is usually a different color. A check valve should be installed in order to prevent pumped water in the discharge line from re-entering the sump pit when the device is turned off. Without this valve, the pump will have to work twice as hard to remove the same column of water, which causes unnecessary strain to the pump components. A check valve can also prevent the rare yet disturbing possibility that a discharge line connected to a stream or pond will back-siphon into the sump pit.
  • a backup power source. Power outages are most likely to happen during heavy rains and floods, which are situations when the sump pump is most needed. For this reason, combined with the nuisance-tripping from GFCIs, sump pumps should have a backup power source to rely on. A pump powered by a battery or the home’s water pressure can also be installed as a backup. Installation of a backup power source or backup pump is not a requirement, but can be offered to a client as a recommendation.
  • that the pit that is large enough for the pump. The sump pit does not need to be constructed from any particular material, as long as it is solid and provides permanent support for the pump. It must, however, be large enough to allow the pump room to work properly. Some homeowners use a 5-gallon bucket as a sump pit, but this is insufficient. For most homes, the sump pit should not be less than 24 inches deep and 18 inches wide. One of the most common reasons why sump pumps fail is that the float gets jammed between the pump and the pit because the pit is too cramped.
  • a cover. The sump pit should be covered to prevent water from evaporating into the home.
Discharge Location

InterNACHI inspectors are not required to check for a proper discharge location. They can note an improper discharge if they see it, but searching outdoors for the discharge is not recommended. The following is good general information that can be passed on to the homeowner:

  • Water must be discharged at least 20 feet from the building.
  • Water should not drain back into the house! Cycling water will place unnecessary strain on the pump and can weaken the structure’s foundation.
  • Water should not drain onto a neighbor’s property without their approval.
  • Many jurisdictions do not permit pumped water into public sewer systems.
  • Pumped water should never drain into a residence’s septic system. Especially during heavy rain, a septic drain field will become saturated and will struggle to handle the normal flow of water from the house. Additional water from the sump pump can damage the septic system.
In summary, sump pumps are used to remove excess water from homes that would otherwise cause property damage. There are multiple types, but they all monitor water levels and ensure that they do not rise higher than predetermined levels. Proper maintenance and inspection will ensure pump efficiency and prolong their lifespan.
This article is for InterNACHI and can be found at https://www.nachi.org/sump-pumps.htm.
Red Horse Home Inspection is based out of Rapid City, SD and services the entire Black Hills area.  Our certified home inspector offers buyer home inspection, pre-listing home inspection, radon testing, and water testing.  If you need to schedule a home inspection you can easily schedule online or call Clint at 490-2916.  Follow us on Facebook.  Check our a sample home inspection report and see the latest reviews.  Take a look at Red Horse Home Inspection Google My Business page.

by Nick Gromicko, CMI® and Ethan Ward

Mold in the Home

Health concerns related to the growth of mold in the home have been featured heavily in the news.  Problems ranging from itchy eyes, coughing and sneezing to serious allergic reactions, asthma attacks, and even the possibility of permanent lung damage can all be caused by mold, which can be found growing in the home, given the right conditions. home inspector mold inspection rapid city sd

All that is needed for mold to grow is moisture, oxygen, a food source, and a surface to grow on.  Mold spores are commonly found naturally in the air.  If spores land on a wet or damp spot indoors and begin growing, they will lead to problems.  Molds produce allergens, irritants and, in some cases, potentially toxic substances called mycotoxins.  Inhaling or touching mold or mold spores may cause allergic reactions in sensitive individuals.  Allergic responses include hay fever-type symptoms, such as sneezing, runny nose, red eyes, and skin rash (dermatitis).  Allergic reactions to mold are common.  They can be immediate or delayed.  Molds can also trigger asthma attacks in people with asthma who are allergic to mold.  In addition, mold exposure can irritate the eyes, skin, nose, throat and lungs of both mold-allergic and non-allergic people.

As more is understood about the health issues related to mold growth in interior environments, new methods for mold assessment and remediation are being put into practice.  Mold assessment and mold remediation are techniques used in occupational health.  Mold assessment is the process of identifying the location and extent of the mold hazard in a structure.  Mold remediation is the process of cleanup and/or removal of mold from an indoor environment.  Mold remediation is usually conducted by a company with experience in construction, demolition, cleaning, airborne-particle containment-control, and the use of special equipment to protect workers and building occupants from contaminated or irritating dust and organic debris.  A new method that is gaining traction in this area is abrasive blasting.

Abrasive Blasting

The first step in combating mold growth is not to allow for an environment that is conducive to its growth in the first place.  Controlling moisture and assuring that standing water from leaks or floods is eliminated are the most important places to start.  If mold growth has already begun, the mold must be removed completely, and any affected surfaces must be cleaned or repaired.  Traditional methods for remediation have been slow and tedious, often involving copious amounts of hand-scrubbing and sanding.  Abrasive blasting is a new technique that is proving to be less tedious and time-consuming, while maintaining a high level of effectiveness.

Abrasive blasting is a process for cleaning or finishing objects by using an air-blast or centrifugal wheel that throws abrasive particles against the surface of the work pieces. Sand, dry ice and corncobs are just some of the different types of media used in blasting.  For the purposes of mold remediation, sodium bicarbonate (baking soda) and dry ice are the media commonly used.

Benefits of Abrasive Blasting

Abrasive (or “media”) blasting provides some distinct advantages over traditional techniques of mold remediation.  In addition to eliminating much of the tedious labor involved in scrubbing and sanding by hand, abrasive blasting is extremely useful for cleaning irregular and hard-to-reach surfaces.  Surfaces that have cross-bracing or bridging can be cleaned more easily, as well as areas such as the bottom of a deck, where nails may be protruding.  Areas that are difficult to access, such as attics and crawlspaces, can also be cleaned more easily with abrasive blasting than by traditional methods.  The time saved is also an advantage, and the typical timeframe for completion of a mold remediation project can often be greatly reduced by utilizing abrasive blasting.

Soda-Blasting

Soda-blasting is a type of abrasive blasting that utilizes sodium bicarbonate as the medium propelled by compressed air.  One of the earliest and most widely publicized uses of soda-blasting was on the restoration of the Statue of Liberty. In May of 1982, President Ronald Reagan appointed Lee Iacocca to head up a private-sector effort for the project.  statue of libertyFundraising began for the $87 million restoration under a public-private partnership between the National Park Service and The Statue of Liberty-Ellis Island Foundation, Inc.  After extensive work that included the use of soda-blasting, the restored monument re-opened to the public on July 5, 1986, during Liberty Weekend, which celebrated the statue’s  centennial.

The baking soda used in soda-blasting is soft but angular, appearing knife-like under a microscope.  The crystals are manufactured in state-of-the-art facilities to ensure that the right size and shape are consistently produced.  Baking soda is water-soluble, with a pH near neutral. Baking-soda abrasive blasting effectively removes mold while minimizing damage to the underlying surface (i.e., wood, PVC, modern wiring, ductwork, etc.).  When using the proper equipment setup (correct nozzles, media regulators, hoses, etc.) and technique (proper air flow, pressure, angle of attack, etc.), the process allows for fast and efficient removal of mold, with a minimum of damage, waste and cleanup.  By using a soda blaster with the correct-size nozzle, the amount of baking soda used is minimized. Minimal baking soda means better visibility while working, and less cleanup afterward.

Dry-Ice Blasting

Dry ice is solidified carbon dioxide that, at -78.5° C and ambient pressure, changes directly into a gas as it absorbs heat.  Dry ice pellets are made by taking liquid carbon dioxide (CO2) from a pressurized storage tank and expanding it at ambient pressure to produce snow.  The snow is then compressed through a die to make hard pellets.  The pellets are readily available from most dry ice suppliers nationwide.  For dry-ice blasting, the standard size used is 1/8-inch, high-density dry ice pellets.

The dry-ice blasting process includes three phases, the first of which is energy transfer.  Energy transfer works when dry ice pellets are propelled out of the blasting gun at supersonic speed and impact the surface. The energy transfer helps to knock mold off the surface being cleaned, with little or no damage.

The freezing effect of the dry ice pellets hitting the mold creates the second phase, which is micro-thermal shock, caused by the dry ice’s temperature of -79º C, between the mold and the contaminated surface.  This phase isn’t as much a factor in the removal of mold as it is for removing resins, oils, waxes, food particles, and other contaminants and debris.  For these types of substances, the thermal shock causes cracking and delaminating of the contaminant, furthering the elimination process.

The final phase is gas pressure, which happens when the dry ice pellets explode on impact.  As the pellets warm, they convert to CO2 gas, generating a volume expansion of 400 to 800 times.  The rapid gas expansion underneath the mold forces it off the surface.

HEPA Vacuuming

A HEPA vacuum is a vacuum cleaner with a high-efficiency particulate air (or HEPA) filter through which the contaminated air flows.  HEPA filters, as defined by the U.S. Department of Energy’s standard adopted by most American industries, remove at least 99.97% of airborne particles that are as small as 0.3 micrometers (µm) in diameter.  HEPA vacuuming is necessary in conjunction with blasting for complete mold removal.

While abrasive blasting with either baking soda or dry ice is an effective technique, remediation will not be complete until HEPA filtering or vacuuming has been done.  Abrasive blasting removes mold from contaminated surfaces, but it also causes the mold spores to become airborne again.  The spores can cover the ground and the surfaces that have already been cleaned.  So, the mold spores need to be removed by HEPA filters.  Additionally, while some remediation companies claim that there will be no blasting media to remove after cleaning, especially with the dry-ice method, there will be at least a small amount of visible debris left by the blasting that must be removed before HEPA vacuuming can occur.  HEPA vacuuming removes all invisible contaminants from surfaces and the surrounding air.  When HEPA vacuuming is completed, samples at the previously contaminated areas should be re-tested to ensure that no mold or mold spores remain.

Abrasive blasting using dry ice or baking soda, combined with HEPA-filter vacuuming, is an effective method for mold remediation.  InterNACHI inspectors who offer ancillary mold inspection services should be aware of the benefits and applications of this technique adapted for remediating mold in homes.  This article is from InterNACHI and can be found at https://www.nachi.org/abrasive-blasting.htm.
Red Horse Home Inspection services the Black Hills of South Dakota.  We cover all of the Black Hills which includes Rapid City, Piedmont, Black Hawk, Summerset, Sturgis, Whitewood, Spearfish, Belle Fourche, Deadwood, Lead, Hot Springs, Custer, Hill City, Keystone, Hermosa, Hermosa, Box Elder, Rapid Valley, and everywhere in between.  Our home inspector is certified and licensed in South Dakota.  Red Horse Home Inspection offers radon testing and water testing.  You can easily schedule your home inspection, radon, and water test online.  Please follow us on Facebook.  Check out a sample home inspection report and see the latest reviews.  Take a look at our Google My Business page.

certified home inspector rapid cityBuying a home? It is probably the most expensive purchase you will ever make. This is no time to shop for a cheap inspection. The cost of a home inspection is very small relative to the value of the home being inspected. The additional cost of hiring an InterNACHI-certified inspector is almost insignificant by comparison.

You have recently been crunching the numbers — negotiating offers, adding up closing costs, shopping for mortgages — and trying to get the best deals. Don’t stop now. Don’t let your real estate agent, a “patty-cake” inspector, or anyone else talk you into skimping on the home inspection. InterNACHI-certified inspectors perform the best inspections by far.

InterNACHI-certified inspectors earn their fees many times over. As the most qualified inspectors, they do more, they deserve more, and — yes — they generally charge a little more. Do yourself a favor and pay a little more for the quality inspection you deserve.  This article is from InterNACHI and can be found at https://www.nachi.org/smartchoice.htm.
Our home inspector at Red Horse Home Inspection is an InterNACHI certified home inspector.  If you are ready to schedule your home inspection you can do it online.  Follow us on Facebook.  Take a look at a sample home inspection report and see the latest reviews.  Check out our Google My Business Page.

by Nick Gromicko, CMI® and Kenton Shepard

The Home Inspection Defined

A general home inspection is a visual inspection for system and major accessible component defects and safety issues. The inspection is not technically exhaustive. A “general home inspection” and a “home inspection” are the same thing.

A home inspection is designed to reflect, as accurately as possible, the visible condition of the home at the time of the inspection. Conditions at a home for sale can change radically in only a day or two, so a home inspection is not meant to guarantee what condition a home will be in when the transaction closes. It’s not uncommon for conditions to change between the time of the inspection and the closing date.

Above:  an overloaded outlet with no cover

It’s a Visual Inspection

A “visual” inspection means that a home inspection report is limited to describing conditions in those parts of a home that an inspector can see during the inspection. Obviously, parts of the home that are permanently hidden by wall, ceiling and floor coverings are excluded, but so are parts of the home that were inaccessible during the inspection for some other reason. Some reasons might include lack of an access point, such as a door or hatch, or a locked access point, or because an occupant’s belongings blocked access, or because of dangerous or unsanitary conditions.

There can be many more reasons. The point is that if an inspector can’t see a portion of the home, the inspector can’t assume responsibility for ensuring that a safe and proper condition exists or that systems are operating properly in that hidden space.

Safety

Safety can be a matter of perception. Some conditions, such as exposed electrical wiring, are obviously unsafe. Other conditions, such as the presence of mold, aren’t as clear-cut.

In the example of the possible existence of mold, it’s difficult to accurately call it out during a general home inspection because mold sometimes grows in places where it can’t be readily seen, such as inside walls, making its discovery beyond the scope of the inspection.  Also, the dangers to human health are from the inhalation of spores from indoor air.

Most people with healthy immune systems have little or no problem with inhaling spores. A few people whose immune systems are compromised by lung disease, asthma or allergies can develop serious or even fatal fungal infections from mold spore levels that wouldn’t affect most people. Every home has mold and mold colonies can grow very quickly, given the right conditions. Mold can be a safety concern, but it often isn’t. The dangers represented by mold are a controversial subject. Other potential safety issues also fall into this category.

Above:  the cutting torch and gutter system of roof drainage management

System Defects
Although the majority of the inspection is visual, the InterNACHI Standards of Practice do require inspectors to operate space and water heating equipment, and air-conditioning equipment, if it can be done without damaging the equipment.

Inspectors will also examine the major accessible components of certain systems as required by the Standards of Practice. Furnace air filters are one example.

A home inspection is not technically exhaustive, meaning that systems or components will not be disassembled as part of the inspection. For example, an inspector will not partially disassemble a furnace to more accurately check the condition of the heat exchanger. Inspectors typically disclaim heat exchangers.

Hazardous Materials

Asbestos, mold, lead, water purity, and other environmental issues or potential hazards typically require a specialist inspection, and may additionally require laboratory analysis.

Home Inspectors are Generalists

Home inspectors are not experts in every home system but are generalists trained to recognize evidence of potential problems in the different home systems and their major components. Inspectors need to know when a problem is serious enough to recommend a specialist inspection. Recommendations are often made for a qualified contractor, such as a plumber or electrician, and sometimes for a structural engineer.

Above:  the result of subfloor movement

Inspector Qualifications

Very few home inspectors have been in the inspection industry for their entire working lives. According to an InterNACHI poll, about half the home inspectors have a background in the building trades. Those with a construction background started with a general idea of the systems and components that they might find installed, as well as how those systems age and fail.

This doesn’t mean that inspectors with a background in something other than the building trades are not qualified — only that they started in the inspection industry at a relative disadvantage. Building the skills and developing the judgment to consistently recognize and interpret evidence correctly and make appropriate recommendations are things that can be improved with practice and continuing education.

Above:  improper electrical splice

Managing Expectations

Part of a home inspector’s job is to manage the expectations of their client. This is especially true when a client has never dealt with a home inspector before. Explaining the limitations of a home inspection to a client will help them develop realistic expectations concerning what to expect from a home inspection report, and what lies beyond the scope of the inspection.

When a home buyer is interviewing inspectors, the buyer should ask about how the inspector handles special safety concerns.

Disclaimers are portions of an inspection agreement or report in which an inspector notifies the client that the inspector will not accept the responsibility for confirming the condition of a portion of the home or of a particular system or component.

Creating realistic expectations in a client’s mind will help prevent misunderstandings and promote smooth real estate transactions.  This article is from InterNACHI and can be found at https://www.nachi.org/limitations-home-inspection.htm.
Red Horse Home Inspection of the Black Hills of South Dakota, preform home inspections, radon test, and water test.  You can easily schedule your home inspection online.  Follow us on Facebook.
by Nick Gromicko, CMI® and Kenton Shepard
condensation in window home inspection rapid cityCondensation is the accumulation of liquid water on relatively cold surfaces.
Almost all air contains water vapor, the gas phase of water composed of tiny water droplets. The molecules in warm air are far apart from one another and allow the containment of a relatively large quantity of water vapor. As air cools, its molecules get closer together and squeeze the tiny vapor droplets closer together, as well. A critical temperature, known as the dew point, exists where these water droplets will be forced so close together that they merge into visible liquid in a process called condensation.

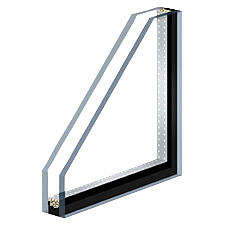
Double-pane windows have a layer of gas (usually argon or air) trapped between two panes of glass that acts as insulation to reduce heat loss through the window. Other types of gas used in this space have various effects on heat gain or loss through the window. Some windows also have a thin film installed between panes that separates the space between the panes into two spaces, further reducing heat loss and heat gain through the window. If multiple-pane windows appear misty or foggy, it means that the seal protecting the window assembly has failed.

Silica Desiccantsilica desiccant home inspection rapid city

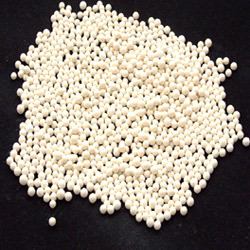
A desiccant is an absorbent material designed to maintain dryness in the space it protects. In a double-paned window, silica pellets inside the aluminum perimeter strip absorb moisture from any incoming air that enters the space between the panes. If not for the silica desiccant, any moisture in the space between the panes would condense on the glass as the glass cools below the dew point temperature.

Silica gel has an immense surface area, approximately 7,200 square feet per gram, which allows it to absorb large amounts of water vapor. As the sealant protecting this space fails over time, increasing amounts of moisture-containing air will enter the space between the panes, and the silica pellets will eventually become saturated and will no longer be able to prevent condensation from forming. A double-paned window that appears foggy or that has visible condensation has failed and needs to be repaired or replaced.

Why Double-Paned Windows Fail:  Solar (Thermal) Pumping
Although double-paned windows appear to be stable, they actually experience a daily cycle of expansion and contraction caused by thermal pumping. Sunlight heats the airspace between the panes and causes the gas there to heat up and expand, pressurizing the space between the panes. At night, the window cools and the space between the panes contracts. This motion acts like the bellows of a forge and is called thermal pumping.

Over time, the constant pressure fluctuations caused by thermal pumping will stress the seal. Eventually, the seal will develop small fractures that will slowly grow in size, allowing increasing amounts of infiltration and exfiltration of air from the space between the panes.

Failure Factors

Windows on the sunny side of a home will experience larger temperature swings, resulting in greater amounts of thermal pumping, seal stress and failure rates.

Vinyl window frames have a higher coefficient of expansion resulting in greater long-term stress on the double-pane assembly, and a higher failure rate. Windows also experience batch failure, which describes production runs of windows, especially vinyl windows, that are defective, meaning that the pane assemblies have been manufactured with seals that have small defects that will cause the window to fail prematurely.

The Nature of Damage

If it’s allowed to continue, window condensation will inevitably lead to irreversible physical window damage. This damage can appear in the following two ways:

  • riverbedding.  Condensed vapor between the glass panes will form droplets that run down the length of the window. Water that descends in this fashion has the tendency to follow narrow paths and carve grooves into the glass surface. These grooves are formed in a process similar to canyon formation.
  • silica haze.  Once the silica gel has been saturated, it will be eroded by passing air currents and accumulate as white “snowflakes” on the window surface. It is believed that if this damage is present, the window must be replaced.

Detecting Failure

Condensation is not always visible. If the failure is recent, a failed window may not be obvious, since condensation doesn’t usually form until the window is heated by direct sunlight. Windows in the shade may show no evidence of failure, so inspectors should disclaim responsibility for discovering failed double-paned windows.

Thermal Imaging as a Detection Tool

Under the right conditions, it’s possible to use an infrared (IR) camera to detect failed windows. IR cameras are designed to record differences in temperature. thermal image from home inspection rapid city sd

InterNACHI provides a thermal imaging course that includes information on using IR cameras for this purpose, and has a message board forum devoted to IR.

Recommendations for Failed Windows

According to industry experts, the glazing assembly can be replaced  approximately 75% of the time.  Occasionally, the sashes must be replaced, and only about 5% of those cases require that the entire window be replaced.

Inspectors should be aware that there are companies that claim to be able to repair misty windows through a process known as “defogging.”

This repair method proceeds in the following order:

  1. A hole is drilled into the window, usually from the outside, and a cleaning solution is sprayed into the air chamber.
  2. The solution and any other moisture are sucked out through a vacuum.
  3. A defogger device is permanently inserted into the hole that will allow the release of moisture during thermal pumping.

Inspectors should know that there is currently a debate as to whether this process is a suitable repair for windows that have failed, or if it merely removes the symptom of this failure. Condensation appears between double-paned windows when the window is compromised, and removal of this water will not fix the seal itself. A window “repaired” in this manner, although absent of condensation, might not provide any additional insulation. This method is still fairly new and opinions about its effectiveness range widely. Regardless, “defogging” certainly allows for cosmetic improvement, which is of some value to homeowners. It may also reduce the potential for damage caused by condensation in the form of mold or rot.  Some skepticism exists about the effectiveness and cost effectiveness of this method of repair.

In summary, condensation in double-paned windows indicates that the glazing assembly has failed and needs repair or replacement. Visible condensation can damage glazing and is the main indication of sealant failure.  This article is from InterNACHI and can be found at https://www.nachi.org/condensation-double-paned-windows.htm.

Red Horse Home Inspection is proud to service the Black Hills of South Dakota.  Red Horse Home Inspection inspects homes in Rapid City, Piedmont, Black Hawk, Summerset, Sturgis, Whitewood, Spearfish, Belle Fourche, Deadwood, Lead, Hot Springs, Custer, Hermosa, Box Elder, Rapid Valley, and surrounding areas.  Schedule your home inspection online and follow us on Facebook.

by Nick Gromicko, CMI®

Asbestos cement is a composite material consisting of Portland cement reinforced with asbestos fibers. When manufacturers figured out ways to produce siding made using asbestos cement, it became very popular for a number of years before being banned in the U.S. in the 1970s. InterNACHI inspectors are likely to come across this form of exterior cladding during inspections. Inspectors and homeowners alike can benefit from knowing more about how the known health risks of asbestos apply to asbestos cement siding, too, as well as some of the common problems and issues associated with the material’s damage and deterioration.

History

Asbestos cement first came into use as an exterior cladding after 1907, when Austrian engineer Ludwid Hatschek came up with a way to shape the material into sheets, allowing it to be manufactured as siding and shingles. By the 1920s, the National Board of Fire Underwriters recommended that asbestos cement replace wood as siding and roofing material because of its superior fire-resistant properties. This recommendation from a nationally known insurance board contributed to a boost in sales and, by the 1940s, hundreds of thousands of homes in the U.S. had been constructed using asbestos cement siding.

During the late 1960s and early ‘70s, however, the news media began to report on the health hazards associated with asbestos. As reports increased, concern grew, so the federal government took action and, in 1973, the EPA banned the use of asbestos in the manufacture of building products.

Health Risks Associated with Asbestos Cement

Asbestos fibers are a proven health hazard if inhaled. Asbestos dust is a known cause of a type of lung cancer called asbestosis. Mesothelioma, another deadly form of cancer that attacks internal organs, can also be caused by exposure to asbestos. However, asbestos cement siding that has been properly installed and is not in a state of decay presents no health risks as long as it remains undisturbed. This is because the cement binds the asbestos fibers and prevents their release into the air, under normal use and maintenance.

The EPA deems asbestos to be hazardous when it is in a friable state, meaning that it can be crumbled, crushed or pulverized by hand pressure. Crushed asbestos in a powdery form can allow its particles to become airborne and inhaled, causing potential health problems. Asbestos cement products that are not in a friable state are not considered hazardous. The only potential danger is when the cement is disturbed in a way that causes the asbestos fibers to become airborne.

If mechanical activities performed on the siding, such as chipping, sawing, grinding or sanding, allow particles to become airborne, then the cement is considered in a friable state and, consequently, hazardous. Deterioration can also lead to particles becoming airborne and potentially dangerous.

Advantages

  • Asbestos cement siding is highly fire-resistant and will not burn or melt the way vinyl and wood siding will.
  • It resists termite damage.
  • It resists rotting.
  • It has been manufactured with textures intended to simulate the look of other cladding materials, such as wood grain.
  • It is fairly easy to clean and maintain.
  • Unlike more porous siding materials, such as wood clapboard, asbestos cement siding will not quickly soak up paint, which allows it to be painted more easily.

Disadvantages

  • Asbestos cement siding is very brittle and can be easily chipped, cracked or broken.
  • The use of a pressure washer for maintenance can crack the siding and lead to moisture intrusion, if the pressure setting is high enough.
  • Asbestos cement can be dangerous if pulverized by sawing, sanding, breaking, etc.
  • It is difficult to find replacement siding for repairs.
  • This product cannot be refurbished, unlike other forms of siding.  Wood clapboard, for example, can be sanded and re-painted, and cedar shake siding can be sand-blasted and re-stained.  Either of these methods can restore wood close to its original state.  But this is not possible with asbestos cement siding.
  • It is no longer considered aesthetically desirable.

Maintenance

Damage and deterioration can lead to structural and health issues, so proper maintenance of asbestos cement building materials is a primary concern.  Keeping the siding clean and performing any minor repairs as soon as they become necessary are both important.

Asbestos cement siding is fairly brittle and has little resistance to cracking, chipping and damage from impact, which can cause asbestos particles to become airborne.  Damage to the siding can also lead to other damage related to moisture intrusion.  Damaged areas that cannot be fixed can be replaced with non-asbestos fiber cement by a professional.  Specific fiber cement materials have been manufactured for repairs that are intended to mimic the look of asbestos cement siding.

Landscaping features, such as a row of shrubs, can be incorporated around the home to help protect the siding from impact damage.

Inspection Tips

Here are some common problems associated with asbestos cement siding that inspectors are likely to encounter:

  • Chipping and cracking often occur with this brittle material.
  • Fasteners used to hold the siding in place may deteriorate at a faster rate than the siding.
  • Discoloration and staining may occur from corrosion or runoff from an adjacent material.  The discoloration may be normal, but it could also indicate a chemical reaction that has decreased the durability of the material.
  • Like many other cement products, efflorescence may appear on asbestos cement siding.  This crystalline growth can indicate that water is passing through the material, promoting deterioration of the cement.
  • Biological growth, such as moss and algae, can occur if conditions are favorable.  This growth may stimulate surface deterioration and staining.
Because it was such a popular cladding material for many years, inspectors are likely to encounter asbestos cement siding when inspecting exteriors.  Knowing some of the health risks associated with this material can be useful when answering clients’ questions about asbestos, although any specific concerns should be deferred to the appropriate healthcare professional.  Homeowners will want to hire an InterNACHI inspector for the periodic inspection of this type of cladding as part of their annual or regular home maintenance.  This article is from InterNACHI and can be found at https://www.nachi.org/asbestos-cement-siding-inspection.htm.

by Nick Gromicko, CMI®

Fireplaces and wood stoves are designed to burn only one type of fuel. Used as all-purpose incinerators, these devices can pose the following hazards:

  • Harmful vapors can vent into the living space. Even the most efficient fireplaces will vent directly into the living space while they’re opened and closed for cleaning and refueling, exposing everyone in the house to potentially dangerous fumes.Firewood drying out in the sun
  • Harmful vapors will vent to the outdoors. Most newer fireplaces and wood stoves do an excellent job of funneling smoke and fumes to the outdoors, but the problem doesn’t end there; this pollution persists, contaminating household and environmental air.
  • Burning inappropriate fuel can cause mechanical damage. Chimneys can become lined with residue from inappropriate items, which may lead to a dangerous chimney fire. The fumes from certain items will quickly wear out sensitive components, such as catalytic combustors in wood stoves.

Read the following guidelines to better understand what can and cannot be safely burned in a residential fireplace or wood stove.

What can be burned in a fireplace?

  • dried, cut firewood. An adequate fuel supply will consist of a mixture of hardwoods, such as maple and oak, and softwoods, such as fir and pine. Softwoods ignite quickly and are useful in the early stages of the fire, while hardwoods provide a longer-lasting fire, and are best used after preheating the chimney. Despite the different burning characteristics of hardwoods and softwoods, which can be attributed to differences in density, the heat-energy released by burning wood is the same, regardless of species. To dry out wood, it should be stacked in an open area so the sun can warm the pieces and the breezes can carry away the moisture. Poplar, spruce and other softwoods generally dry quickly, as do wood that has been split small. Adequately seasoned wood has a moisture content of less than 20%, which can be checked using the following indicators:
    • The wood has darkened from white or a cream color to yellow or grey.
    • There are cracks or checks in the end grain.
    • A hollow sound is produced when two pieces of wood are banged together.
    • You can split a piece and feel if the new surface is damp or dry.
    • The wood does not hiss while burning.
    • You can check its moisture content with a moisture meter.Used pallets burn efficiently, but you must be sure they are free from chemical treatment
  • pallets. Generally, pallets are safe to burn in fireplaces, although those that are treated with the fumigant methyl bromide (labeled with the initials MB) are unsafe to burn. Also, pallets may have been exposed to a variety of chemicals while they were in use. Aside from these concerns, pallets produce a hot flame because they’re usually very dry and their segments are thin. Be careful to check for nails while cutting pallets, as they may damage a saw blade. You may also wind up with nails in your ash, which should be disposed of far from roads and driveways.
  • fallen tree limbs. These can generally be collected and used for kindling, provided they have been given time to dry.
  • wood collected from housing developments. If it is truly trash and not someone’s property (including the housing contractor’s), using scavenged wood that has been cleared away for housing developments is good for burning.  Try to obtain it before the non-lumber grade wood is pushed into massive piles and burned as a means of disposal by the contractor.
  • fire logs. These artificial logs burn relatively cleanly and release less ash than their natural wood counterparts.

What should never be burned in a fireplace?

  • painted wood. Paint contains heavy metals, such as lead, chromium and titanium, which are used to make the different colors. These metals, especially lead, can be toxic even in small quantities if inhaled. If you’re unsure if your paint has lead, be sure to consult with your InterNACHI inspector during your next scheduled inspection.
  • pressure-treated wood. Wood is commonly made resistant to fungus and insects through the addition of copper, chromate and arsenic, in a process known as CCA treatment. CCA treatment places roughly 27 grams of arsenic in every 12-foot 2×6, which is sufficient to kill about 250 adults, which is why it is illegal in the U.S. to burn pressure-treated wood. Vaporized CCA wood, known as fly ash, is extremely toxic; in one case, as reported by the American Medical Association, a family was stricken with seizures, hair loss, debilitating headaches, blackouts and nosebleeds from fly ash released when they unknowingly used CCA wood to burn in their fireplace. Even the family’s houseplants and fish succumbed to the toxic fumes.
  • plywood, particleboard, chipboard or OSB. These manmade woods release formaldehyde, and potentially hydrochloric acid or dioxin, when burned. Some states have outlawed the incineration of some or all of these artificial wood products.
  • rotted, diseased or moldy wood. This wood will not burn as long as normal wood, may produce bad smells when burned, and could bring insects into the house.
  • damp wood. Wood that has a moisture content higher than 20% will burn inefficiently and will contribute to a greater accumulation of creosote in the chimney, as well as air pollution.
  • allergenic plants.  Urushiol, which is the chemical that induces the typically minor allergic reaction when skin is exposed to poison ivy, poison sumac or poison oak, is far more dangerous when inhaled. Urushiol is not destroyed by fire and can quickly cause life-threatening respiratory distress if any of these plants are burned.
  • dryer lint. While it’s often used effectively as a fire-starter, lint can contain a wide array of dangerous chemicals that come from your clothes and fabric softener.
  • trash. Never burn household garbage, as it contains a range of potentially hazardous materials and chemicals that react in unpredictable ways when burned together. Newspaper ink, plastics, aluminum foil, plastic baggies, and whatever else constitutes your particular trash can create a deadly chemical cocktail.
  • driftwood. Wood found on the beach of an ocean or salty lake will release salt when burned, which will quickly corrode any metal and etch the glass of a wood stove or fireplace. Catalytic converters are especially vulnerable to salt corrosion. In addition to potential damage to the stove or fireplace, the EPA claims that driftwood releases toxic chemicals when burned.
In summary, use only approved and appropriate fuel to burn in your fireplace or wood stove, because certain items should never be burned because they can cause problems ranging from minor irritation to a hazardous health threat to your family.  This article is from InterNACHI and can be found at https://www.nachi.org/fireplace-fuel.htm.
Red Horse Home Inspection is proud to service the Black Hills of South Dakota.  Red Horse Home Inspection performs home inspections, radon test and water test.  Our home inspector will perform home inspections in Spearfish, Sturgis, Deadwood, Lead, Custer, Belle Fourche, Newell,  Hot Springs, Keystone, Hill City, Hermosa, Box Elder, Summerset, New Underwood, Piedmont, Black Hawk, Rapid City, Rapid Valley, and surrounding areas.  Red Horse Home Inspection offers easy online scheduling.  Follow us on Facebook.